Table of Contents >> Show >> Hide
- Why Peel and Stick Tile Is So Popular
- Before You Start: Make Sure Your Surface Is Actually Ready
- Tools and Materials You’ll Want Nearby
- How to Lay Peel and Stick Tiles: Step-by-Step
- Step 1: Measure the Space and Buy a Little Extra
- Step 2: Let the Tile Acclimate
- Step 3: Prep the Surface Like a Professional
- Step 4: Find Your Center Line or Starting Guide
- Step 5: Dry Fit Before You Peel Anything
- Step 6: Plan Around Obstacles Before They Surprise You
- Step 7: Peel, Place, and Press
- Step 8: Cut the Edge Pieces Carefully
- Step 9: Roll or Smooth the Surface Firmly
- Step 10: Finish the Edges, Grout if Allowed, and Let It Set
- Common Peel and Stick Tile Mistakes to Avoid
- Floor Tile vs. Wall Tile: Know the Difference
- What to Watch for in a Video Tutorial
- Real-World Experience: What This Project Actually Feels Like
- Final Thoughts
Peel and stick tile is the home-improvement version of a magic trick. One minute your floor or backsplash looks tired, dated, and vaguely offended by your decorating choices. A few hours later, it looks fresh, stylish, and suspiciously expensive. The catch? You only get that “wow” result if you slow down long enough to do the boring stuff well. Yes, I mean measuring. Yes, I mean cleaning. No, the dust bunny in the corner is not part of the pattern.
The good news is that learning how to lay peel and stick tiles is completely doable for beginners. You do not need a contractor, a wet saw, or a personality transplant into someone who casually says things like “substrate prep is my passion.” You do, however, need a clean surface, a smart layout, sharp cuts, and enough patience to avoid peeling five backing sheets at once like you are in a race against the universe.
This step-by-step guide walks you through the full process, from prep to finishing touches, with practical examples, common mistakes to avoid, and a simple video checklist so you can follow along visually while you work.
Video tip: Before you start sticking anything, watch a short installation video from your tile brand or a major home-improvement retailer. The most helpful videos show four things clearly: layout lines, how the first tile is placed, how edge cuts are made, and how the installer presses or rolls the surface at the end.
Why Peel and Stick Tile Is So Popular
Peel and stick tile works because it solves three problems at once: cost, mess, and commitment. Traditional tile can look gorgeous, but it also brings mortar, grout haze, cure times, and the kind of cleanup that makes you question your life choices. Peel and stick tile, by contrast, is fast, relatively affordable, and beginner-friendly.
It is especially useful for kitchens, laundry rooms, powder rooms, rental-friendly refreshes, accent walls, and low-drama floor makeovers. Many products mimic stone, wood, subway tile, mosaic, or marble surprisingly well. Some are made for floors, some for walls, and some can do both. That does not mean every tile works everywhere, though, so check the label before you buy. A backsplash tile is not automatically a floor tile, and a floor tile is not secretly auditioning to survive inside your shower.
Before You Start: Make Sure Your Surface Is Actually Ready
This is the part people love to skip. It is also the part that decides whether your new tile looks crisp for years or starts curling in the corners like a grumpy potato chip.
Peel and stick tiles adhere best to surfaces that are clean, smooth, dry, and stable. For floors, that usually means properly prepared concrete, vinyl, or underlayment-grade wood. For walls, that usually means smooth painted drywall, primed surfaces, or existing flat tile with the grout lines filled or flush enough not to telegraph through the new material.
Avoid installing over loose flooring, damaged substrate, peeling paint, greasy walls, heavily textured surfaces, or anything exposed to direct, constant water unless the product specifically says it can handle that. A backsplash near a sink is one thing. A shower wall that gets blasted like a car wash is another.
Tools and Materials You’ll Want Nearby
- Peel and stick tiles made for your surface
- Tape measure
- Pencil
- Level or straightedge
- Chalk line for floors
- Utility knife with fresh blades
- Scissors for some wall tiles
- Cutting mat or scrap board
- Cleaning cloths or microfiber rags
- Mild cleaner or degreaser
- Vacuum or dust mop
- Roller, grout float, or smoothing tool depending on product
- Optional primer, patching compound, or caulk/sealant if your instructions call for them
Knee pads are also a brilliant idea for floor projects. Not glamorous, but your kneecaps will write you a thank-you note.
How to Lay Peel and Stick Tiles: Step-by-Step
Step 1: Measure the Space and Buy a Little Extra
Start by measuring the full area you plan to cover. Multiply length by width to get square footage. Then buy extra tile for cuts, pattern matching, and the inevitable “well, that cut was optimistic” moments. For most projects, adding about 10 percent extra is a smart cushion. If you are working with lots of corners, odd shapes, or bold patterns, give yourself a bit more breathing room.
This step is not just about quantity. It is also about layout. You want to know in advance whether the room or wall will leave you with skinny slivers at the edges. Nothing ruins a polished DIY job faster than a one-inch strip of tile clinging to the wall like it lost a bet.
Step 2: Let the Tile Acclimate
Bring the tile into the room where it will be installed and let it sit according to the product instructions. Many peel and stick floor products want time in the room so the material can adjust to the space’s temperature and humidity before installation. In plain English, the tiles need to calm down and stop reacting to their dramatic entrance.
Do not leave the boxes in a garage, on a porch, or in a freezing car and then expect perfect adhesion five minutes later. Material movement is real, and peel and stick products behave better when they are installed under stable indoor conditions.
Step 3: Prep the Surface Like a Professional
For floors, remove furniture, base shoe if needed, and any debris. Vacuum thoroughly. Scrape off bumps, paint drips, and old residue. Fill cracks, dips, or deep grout lines if the instructions require it. If you are going over existing tile, those grout lines often need to be filled smooth so they do not show through the new surface.
For walls, clean off grease, dust, and soap film. Sand down rough spots. Patch holes or low areas. If the wall is textured, you may need a skim coat or primer so the adhesive has a flat surface to grab. Around outlets or switches, shut off power first and remove the plates before you start.
The short version is simple: peel and stick tile is only as pretty as the surface under it. If the surface is lumpy, oily, damp, or flaky, the tile will absolutely notice.
Step 4: Find Your Center Line or Starting Guide
For floors, measure the center of opposite walls and snap chalk lines so they cross in the middle of the room. Check that the lines are square. This gives you a visual guide and helps keep the layout balanced.
For walls or backsplashes, use a level and mark a straight reference line. Depending on the space, you might start from a level countertop, a 90-degree corner, or a centered design line. The point is the same: the first row controls everything that follows. If the first tile is crooked, the rest of the project will faithfully continue the chaos.
Step 5: Dry Fit Before You Peel Anything
This is one of the best peel and stick tile tips you will ever hear: lay out the tiles with the backing still on. For floors, place a row along both guide lines and see how the perimeter pieces will land. If the last row will be less than half a tile, shift the layout. For walls, arrange the pattern on a table or hold up the first row to check alignment and cuts.
Dry fitting helps you spot pattern issues, avoid tiny edge pieces, and decide where cut tiles should go. Put those partial cuts in the least noticeable places when possible, such as under furniture, in a corner, or at the far edge of a backsplash.
Step 6: Plan Around Obstacles Before They Surprise You
Measure door jambs, floor vents, cabinets, pipes, corners, outlets, and trim before you begin sticking. Straight cuts are easy. Weird cuts are where projects turn into personality tests.
A smart trick is to make a paper or cardboard template for awkward shapes. On walls, even the saved backing sheet can help you test a cut line. On floors, a template keeps you from slicing into the actual tile like you are improvising modern art.
Step 7: Peel, Place, and Press
Now the satisfying part begins. Start at your center point or guide line. Peel the backing off the first tile and place it carefully. Press firmly from the center outward to avoid air bubbles.
Work slowly and keep joints snug. On floor tiles, follow any directional arrows on the backing if your product includes them. On wall tiles, align the printed or interlocking pattern precisely. Some styles overlap slightly by design, while others butt together edge to edge. Let the pattern tell you what it wants instead of forcing it into a relationship it never asked for.
Many DIYers find it easier to peel part of the backing first, position the tile, then remove the rest. That gives you a little more control, especially with larger pieces.
Step 8: Cut the Edge Pieces Carefully
For floor tile, measure the gap at the wall and mark the cut on the tile. Many products can be scored several times with a sharp utility knife and snapped cleanly. Some homeowners like the overlap trick: place one tile over the last full tile, place another against the wall on top, then mark the cut line where the overlap lands.
For wall tile, use a ruler or straightedge for clean cuts. Vinyl and lighter synthetic sheets may cut with scissors, while thicker or specialty materials may need a more specific cutting method. Always read the product instructions before declaring war on the tile with whatever blade is closest.
Around outlets, measure carefully and remember that the faceplate often covers slight imperfections. Around posts or pipes, templates are your best friend.
Step 9: Roll or Smooth the Surface Firmly
Once the tile is installed, go back and press everything again. Some floor products benefit from a roller to activate and secure the adhesive more completely. Wall tiles usually need firm smoothing with your hands, a credit-card-style tool, or a grout float depending on the brand.
Do not skip this. Gentle tapping and hopeful vibes are not a substitute for proper pressure.
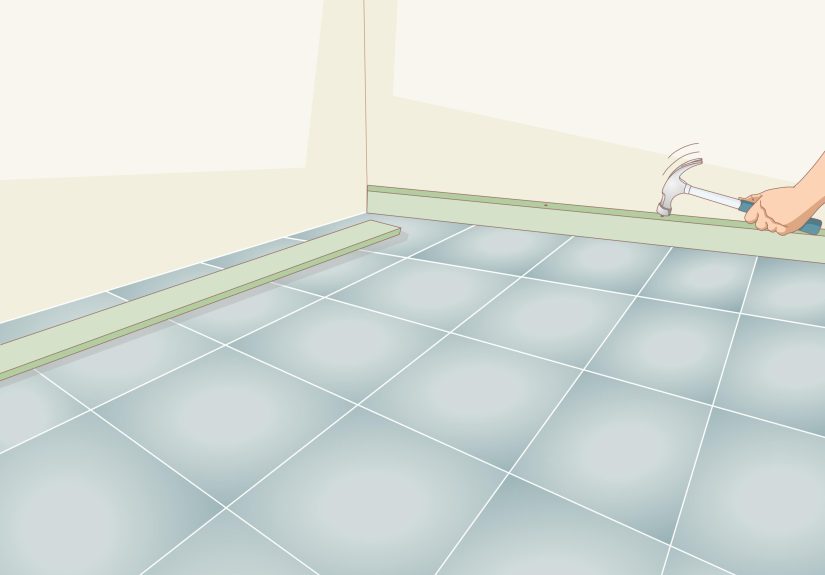
Step 10: Finish the Edges, Grout if Allowed, and Let It Set
Reinstall trim or outlet covers once the tile is in place. If your floor tile is designed for grout, follow the manufacturer’s spacing and cure-time instructions before applying it. Some peel and stick systems want you to wait before grouting so the adhesive can settle properly. For backsplashes, you may also choose a compatible sealant at exposed edges or near sinks if the product instructions recommend it.
After installation, give the surface the recommended set time before heavy use, mopping, or moving furniture back in. This is not the moment to drag your fridge across the room like you are starring in a moving-day action film.
Common Peel and Stick Tile Mistakes to Avoid
- Skipping prep: Dirt, grease, dust, moisture, and texture all weaken adhesion.
- Not dry fitting: This leads to awkward cuts and crooked patterns.
- Starting at the wall without a plan: Center-based floor layouts usually look more balanced.
- Using dull blades: Bad cuts make even expensive tile look cheap.
- Ignoring product limits: Heat zones, direct water, stairs, and unsuitable subfloors matter.
- Touching the adhesive too much: Oils and dust reduce stickiness.
- Rushing the first row: The first row is the boss of the whole project.
Floor Tile vs. Wall Tile: Know the Difference
Floor peel and stick tile is built for foot traffic and usually requires careful layout from the center of the room. Wall peel and stick tile is often more decorative and usually starts from a level guide, a countertop, or a visible focal point. Floor products may call for expansion gaps, rolling, and stricter subfloor prep. Wall products may focus more on grease removal, surface smoothness, outlet cuts, and moisture or heat limitations.
In other words, a kitchen backsplash and a laundry room floor may both use peel and stick tile, but they are not the same project wearing different shoes.
What to Watch for in a Video Tutorial
If you are using a video alongside this article, focus on technique, not just speed. Good tutorials show how to square the layout, how slowly the first tile is positioned, how the backing is handled, how cuts are marked, and how the installer presses or rolls the tile at the end.
The best video tutorials make the job look calm, not magical. If a video jumps from “here is the subfloor” to “ta-da, finished room” in twelve seconds, that is not a tutorial. That is a trust exercise.
Real-World Experience: What This Project Actually Feels Like
Here is the honest experience most people have when laying peel and stick tiles. The first 20 minutes feel easy. You clean, you measure, you line things up, and you think, “Wow, I might be naturally gifted at this.” Then you hit the first weird corner, the first outlet, or the first wall that is very obviously not straight, and the room decides to humble you.
The biggest surprise for many DIYers is how much the final look depends on invisible work. A smooth floor really does matter. A level line really does matter. Dry fitting really does matter. The installation itself is the fun part, but the prep is what makes the fun part look expensive instead of temporary.
Another common experience is realizing that peel and stick tile rewards a slow rhythm. The best results usually come from a simple routine: place, check, press, step back, repeat. People who rush tend to trap bubbles, drift off the line, or create pattern mismatches that become weirdly obvious from across the room. Meanwhile, the people who work methodically usually finish with cleaner seams and less stress.
There is also a psychological moment during almost every project where the room looks worse before it looks better. Half the floor is done. Tools are everywhere. Trim is off. Scraps are piling up. You begin to suspect you have made a terrible mistake. This is normal. Keep going. Peel and stick tile projects often turn the corner visually once the cuts are in and the edges are finished.
Experience also teaches you that corners and edges deserve more attention than the middle. The center of the room is usually forgiving. The perimeter is where craftsmanship shows. Neat edge cuts, well-planned outlet openings, and properly aligned final rows are what make people assume the install was done by someone who definitely owns more than one level.
Many first-time installers also notice that pattern choice affects difficulty. A simple square or subway layout is far more forgiving than a bold geometric print, hexagon look, or interlocking mosaic where misalignment is easier to spot. If this is your first project, choosing a forgiving pattern is not cheating. It is wisdom wearing work gloves.
Then there is the practical side of living with the result. People tend to love peel and stick tile when they use it in the right place. A backsplash can refresh a kitchen fast. A powder room floor can go from dreary to charming in a weekend. A laundry room can suddenly look intentional instead of purely appliance-adjacent. But when people ignore moisture warnings, install over dirty surfaces, or expect a decorative wall tile to act like indestructible commercial flooring, disappointment moves in quickly.
The most useful lesson from real-life installs is this: peel and stick tile is not fake tile pretending to be perfect. It is its own category. It shines when you treat it like a smart, stylish, budget-conscious material with clear strengths and clear limits. Respect those limits, and the project usually feels satisfying, efficient, and honestly kind of addictive. You may even find yourself eyeing another room by Sunday afternoon. That is how these projects get you.
Final Thoughts
If you want a fast, approachable DIY upgrade, peel and stick tile is one of the best weekend projects around. The process is simple, but the finish depends on discipline: prep the surface, mark a true guide, dry fit first, cut carefully, and press firmly. Do those things well and you can get a result that looks polished, intentional, and far more expensive than the project actually was.
So yes, peel and stick tile can absolutely transform a room. Just do not let the words “peel” and “stick” fool you into thinking the whole job is two seconds long. The secret is not speed. The secret is method. And maybe a fresh blade.