Table of Contents >> Show >> Hide
- Why a Crafting Studio Reveal Matters
- The Foundation of a Great Craft Studio
- Storage That Makes a Studio Reveal Shine
- Lighting Can Make or Break the Room
- Style Still Matters, and That Is Not Silly
- Small-Space Ideas That Still Deliver the Reveal
- What Makes the Reveal Feel Finished
- A Sample Crafting Studio Reveal Layout
- The Real Reveal Is How the Room Changes Your Routine
- Experience Notes: Living With a Newly Revealed Crafting Studio
There is messy, and then there is “I swear I just bought that glue gun” messy. A proper crafting studio reveal lives somewhere on the happier side of that line. It is the moment when scattered supplies, half-finished ideas, and mystery cords finally grow up and become a creative workspace that looks good, works hard, and does not make you dig through six bins just to find one spool of ribbon.
The best part of a craft studio makeover is that it is not only about aesthetics. Sure, pretty shelves and color-coded jars are delightful. But a well-designed studio also solves real-life problems: wasted time, visual clutter, bad lighting, awkward work surfaces, and the universal frustration of owning supplies you cannot actually find. A successful crafting studio reveal shows what happens when style stops being decorative fluff and starts pulling its weight.
Whether your setup lives in a spare bedroom, a finished basement, a converted closet, or one brave corner of a guest room, the goal is the same: build a creative space that feels inspiring enough to use and practical enough to maintain. That sweet spot is where the magic happens. It is also where the scissors finally stop disappearing.
Why a Crafting Studio Reveal Matters
A thoughtfully designed craft studio is not just a luxury for serious makers. It is a productivity tool. When every zone has a purpose and every supply has a home, starting a project feels easier. There is less friction, less cleanup dread, and far less time spent rummaging around like a raccoon with a coupon.
That is why so many standout craft room ideas focus on function first. The smartest studios are divided into clear work zones, make good use of wall space, balance visible and hidden storage, and rely on lighting that helps you actually see what you are doing. In other words, the reveal feels impressive because the room has been edited with intention, not just decorated for a photo.
The Foundation of a Great Craft Studio
Zone the room like you mean it
If a crafting studio reveal looks polished, there is a good chance the room has been zoned. Instead of treating the space as one giant catch-all, strong studio design breaks it into purpose-driven areas. You might have a main worktable for cutting and assembling, a desk for sketching or computer tasks, a wall for tools and supplies, and closed storage for the items you use less often.
This layout matters because different crafts create different kinds of chaos. Sewing wants a smooth work surface, thread storage, and room to maneuver fabric. Paper crafting likes drawers, trays, and flat file storage. Painting needs good light and wipeable surfaces. Gift wrapping demands long edges and easy access to rolls, ribbon, tape, and boxes. The more your room acknowledges what you actually make, the more useful it becomes.
One of the biggest wins in a studio reveal is seeing a room stop pretending to be generic. A studio should reflect the work happening inside it. If your main hobby is knitting, the space should not feel like a fake pottery loft. If you scrapbook, you probably need less industrial drama and more shallow storage, labeled categories, and horizontal workspace. Real design starts with real habits.
Choose a work surface that earns its keep
Every successful craft studio reveal has at least one hero surface. Sometimes it is a large farmhouse table in the center of the room. Sometimes it is an L-shaped built-in desk wrapping a wall. Sometimes it is a clever worktable made from storage cubes, cabinetry, or a converted closet desk. The point is not the style. The point is having a surface large enough, sturdy enough, and sensible enough for the way you work.
A cramped tabletop can make even fun projects feel annoying. When you constantly have to clear space before you begin, creativity starts to feel like paperwork. That is why oversized or multipurpose surfaces show up again and again in the best creative workspace ideas. They let you spread out without immediately collapsing into clutter.
If you are working with a small footprint, built-ins are especially useful. Bookcases flanking a desk, a floating worktop in an alcove, or a closet conversion can create a compact craft room without wasting square footage. Add rolling carts or movable side tables and suddenly a tight room behaves like a much larger one.
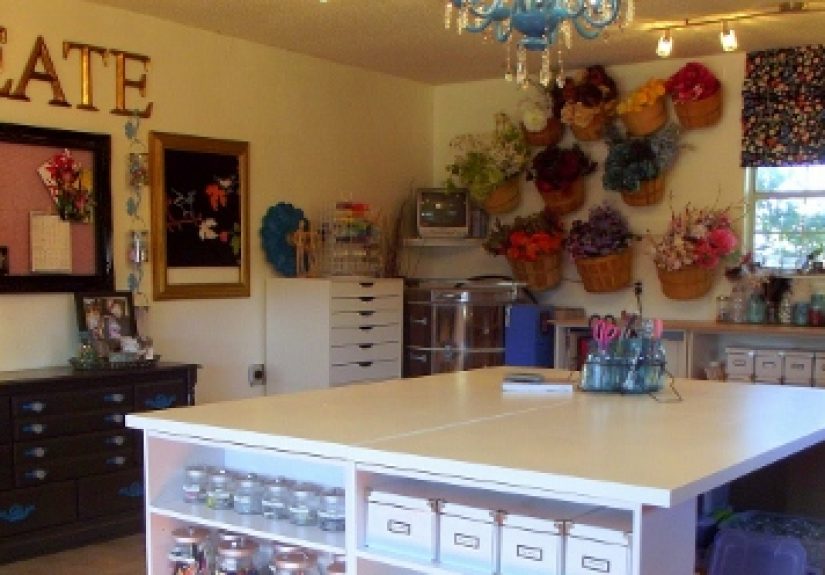
Storage That Makes a Studio Reveal Shine
Mix open and closed storage
The most believable crafting studio reveal is never all open shelving and never all closed cabinets. Too much open storage can look cheerful for about twelve minutes before the room starts resembling a hobby store after an enthusiastic windstorm. Too much closed storage, on the other hand, can bury useful tools and make the space feel stiff.
The smart middle ground is simple. Keep the supplies you use often visible and easy to grab. Tuck the uglier, bulkier, or more chaotic items behind doors and inside drawers. Open shelves are perfect for pretty thread spools, baskets, labeled jars, and a few inspiring materials. Closed cabinets are better for backup stock, seasonal items, adhesives, cords, cutting tools, packaging supplies, and all the weird little things you absolutely need but do not want starring in your room reveal.
Use vertical space like it owes you money
Crafting studios often succeed or fail on the wall. Vertical storage is one of the most effective ways to clear the floor, keep tools within reach, and create a studio that feels organized instead of overstuffed. Tall shelving, ladder-style storage, rail systems, hooks, mounted baskets, and wall organizers are all solid choices for a room that needs to hold a lot without looking heavy.
Thread racks, ribbon dowels, hanging rulers, scissors hooks, and paper organizers can double as decor when arranged neatly. That is one of the underrated joys of a craft studio reveal: the supplies themselves become part of the personality of the room. A rainbow of materials on display can feel warm, lively, and genuinely personal, especially when balanced by neutral cabinetry or a calm wall color.
Pegboards deserve their fan club
Let us pause and give the pegboard its flowers. A pegboard wall is one of the most flexible, affordable, and visually satisfying tools in a craft room makeover. It can hold scissors, rulers, pliers, washi tape, baskets, small shelves, rolls of vinyl, and any other object that normally migrates to the exact wrong place.
The beauty of pegboard storage is that it evolves with your projects. Unlike a fixed drawer insert or overly specific organizer, a pegboard can be rearranged as your hobbies change. Today it holds embroidery hoops. Tomorrow it hosts paintbrushes, heat tools, and a tiny shelf for your ever-growing collection of markers you definitely needed. It is functional, customizable, and weirdly satisfying to look at.
Do not underestimate the little organizers
Sometimes the success of a studio reveal comes down to small details: drawer dividers, clear bins, labels, turntables, trays, file holders, and baskets that keep categories from blending into one giant craft stew. These tools are not glamorous, but they are the reason a room stays usable after the reveal photos are over.
Clear containers are especially helpful because they reduce the “out of sight, out of mind” problem without dumping everything into visual chaos. Labels do not have to look clinical, either. A handwritten tag, a neat printed label, or a simple category system can make the room feel calmer and easier to maintain.
Lighting Can Make or Break the Room
A beautiful craft studio reveal falls apart quickly if the room is dim, shadowy, or full of glare. Good lighting is not optional in a creative space. It is the difference between precision and frustration, especially when you are measuring, cutting, sewing, painting, or working with small details.
The best setup usually combines natural light, ambient light, and task light. Natural light makes colors read more accurately and keeps the room feeling cheerful. Ambient lighting, such as ceiling fixtures or recessed lights, gives the room overall illumination. Task lighting, like under-cabinet strips, adjustable desk lamps, or directed work lights, helps you see the exact area where the action is happening.
If your studio has windows, place your main work area where you can benefit from daylight without creating harsh glare on screens or glossy surfaces. If it does not, the fix is not to panic and turn the room into an interrogation chamber. Instead, layer light thoughtfully. A warm overhead source, focused task light, and a bit of indirect lighting can make a windowless studio feel functional and inviting.
Style Still Matters, and That Is Not Silly
A crafting studio reveal should be practical, but it should also feel like a place you want to enter on purpose. This is where color, art, mood boards, wallpaper, and decorative details come in. Some of the most memorable studio makeovers use a mural, a patterned ceiling, a bold rug, or a favorite paint color to turn a purely functional room into a space with personality.
That does not mean the room has to be loud. Some creators work best in bright, playful environments full of visible color and inspiration. Others prefer a calmer studio with white walls, natural wood, black accents, and a few carefully chosen objects. There is no universal right answer. The right answer is whichever style makes you more likely to sit down and make something.
That is the secret sauce in a great craft room design. The room should support focus, but it should also reflect the person using it. A studio that feels personal usually stays in use longer than one that looks trendy but disconnected from daily life.
Small-Space Ideas That Still Deliver the Reveal
Not everyone has a whole room to dedicate to crafting, and that is fine. A small craft studio can still feel like a full reveal if it is organized well. Closet desks, alcove workstations, wall-mounted tables, rolling carts, and shelving built around an existing desk can create a capable studio in surprisingly tight quarters.
A guest room can become a dual-purpose craft room with a curtain, cabinet wall, or storage bench that conceals the hobby side when visitors arrive. A spare closet can transform into a micro studio with a desktop, shelves, pegboard, and overhead lighting. Even one wall of a bedroom or basement can function beautifully when it includes a good surface, vertical storage, and a place to hide supplies at the end of the day.
The trick with small spaces is discipline. Edit your stash, choose furniture that multitasks, and avoid buying organizers before you know what actually needs organizing. Otherwise, you are just giving your clutter little matching outfits.
What Makes the Reveal Feel Finished
A studio looks complete when it has rhythm. There is a place for active projects, a place for finished work, a place for tools, and a place for the messy middle. The room also needs cleanup support: a trash bin, a recycling spot, maybe a hamper for fabric scraps, and surfaces that wipe down without drama.
Finishing touches matter, too. A framed pinboard, a comfortable chair, a lamp with character, a vintage toolbox repurposed as supply storage, or a line of matching baskets can make the room feel intentional rather than accidental. These details tell the story of a crafting studio reveal without turning the space into a stage set.
If you want the room to stay beautiful, leave a little breathing room. Empty surface area is not wasted space. It is future project space. It is your insurance policy against instant clutter. It is also what lets the room keep its reveal-day charm on a random Tuesday.
A Sample Crafting Studio Reveal Layout
Picture this: one long wall holds built-in lower cabinets with a durable countertop, open shelves above, and a pegboard section in the center for tools. Across from that wall sits a large table on casters, so the layout can flex for sewing, wrapping, painting, or assembling. Near the window is a comfortable desk with a good lamp and a pinboard for planning, sketching, or ordering supplies. A tall cabinet in the corner hides backup materials, and baskets on the upper shelves hold less-used seasonal items.
The palette is clean and light, but not sterile. Maybe warm white walls, pale wood tones, black hardware, and one cheerful accent color through art, storage boxes, or textiles. The room feels bright, calm, and useful. You can start a project quickly, clean it up without a meltdown, and actually enjoy being there. That is the heart of a successful crafting studio reveal.
The Real Reveal Is How the Room Changes Your Routine
The biggest payoff of a craft studio makeover is not that the room photographs well. It is that creativity becomes easier to begin. You stop waiting for the perfect moment because the room is ready before you are. You can walk in, sit down, find what you need, and get to work.
That change sounds small, but it is huge. A room that reduces friction invites consistency. A consistent creative habit is what turns “I should make more time for this” into “I made something this week.” And that, honestly, is a better reveal than any matching storage jar ever could be.
Experience Notes: Living With a Newly Revealed Crafting Studio
One of the most interesting things about a crafting studio reveal is what happens after the room is “done.” The reveal itself is exciting, of course. You open the door, the shelves are styled, the surfaces are clear, the labels are crisp, and suddenly your supplies look less like a problem and more like a possibility. But the real story begins a week later, when real life walks into the room wearing paint on its sleeve and asking where the tape went.
That is when a good studio proves itself. In daily use, the best spaces feel easy. You notice that you are starting projects faster because your tools are visible. You stop using the dining table as a backup plan because your actual workspace is more convenient. The room starts saving you time in tiny ways. Scissors are on the pegboard. Paper is sorted by type. The lamp hits the table at the right angle. The extension cords are not trying to trip you like petty little villains. Everything feels smoother.
There is also an emotional shift that comes with a successful craft room makeover. A creative space that was once chaotic can start to feel restorative. You walk in and your shoulders drop a little. The room is not asking anything from you. It is offering support. That sounds dramatic, but anyone who has ever tried to make something in a cluttered room understands the difference immediately. Disorder can be noisy, even when nobody is talking.
Another common experience is discovering how much easier cleanup becomes when the room is designed well. Cleanup used to feel like a second project. Now it is more like a closing routine. Ribbon goes back in the labeled drawer. Markers return to the bin. Fabric scraps hit the basket. Trash goes out. Done. It is not glamorous, but it is powerful. A room that resets quickly gets used more often.
People also tend to find that their creative identity becomes clearer in a dedicated studio. Once supplies are organized, patterns emerge. You realize you use paper tools constantly but barely touch the candle-making kit. You notice that you love visible color for thread and yarn, but prefer hidden storage for adhesives and tech gear. The room teaches you about your own habits, which makes future updates smarter and less impulsive.
And yes, there is still a little chaos. Any honest crafting studio reveal should admit that. Creative work is not neat by nature. Projects spread out. Ideas pile up. New materials appear out of nowhere like they have signed a lease. But in a well-planned studio, the mess feels active instead of overwhelming. It looks like work in progress, not permanent defeat.
That is why the best reveals stay memorable. They are not about perfection. They are about permission. Permission to make a mess, start again, experiment, leave a project halfway done, and return to it tomorrow without losing your mind. A craft studio that supports that cycle is not just pretty. It is useful, personal, and alive. And that is the kind of reveal worth celebrating.