Table of Contents >> Show >> Hide
- What an Automatic Door Closer Actually Does
- Before You Buy: Pick the Right Closer
- Tools and Materials You’ll Need
- How to Install an Automatic Door Closer
- Step 1: Identify the hand and swing of the door
- Step 2: Choose the mounting position
- Step 3: Tape the template in place
- Step 4: Mark and drill the holes
- Step 5: Mount the closer body
- Step 6: Install the bracket, shoe, or parallel arm plate
- Step 7: Preload the spindle and attach the main arm
- Step 8: Connect the forearm and set the arm geometry
- Step 9: Install the cover
- How to Adjust an Automatic Door Closer
- Accessibility and Code-Smart Tips
- Common Mistakes to Avoid
- Troubleshooting After Installation
- Final Thoughts
- Experience Notes: What Installing an Automatic Door Closer Is Really Like
If you have a door that loves to slam, wander open, or behave like it pays no rent, an automatic door closer is the grown-up fix. Install one properly, and the door closes smoothly, latches reliably, and stops acting like it was raised by wolves. Better yet, a well-adjusted closer can improve safety, security, energy efficiency, and day-to-day convenience.
This guide walks you through how to install an automatic door closer on a standard hinged door, with real-world advice on mounting style, adjustment, common mistakes, and the little details that separate a satisfying DIY project from a three-hour conversation with a stripped screw. The focus here is on the typical hydraulic surface-mounted closer used on residential side-entry, garage, utility, office, and light commercial doors. If you mean a powered push-button ADA opener, that is a different animal and usually a job for a pro.
What an Automatic Door Closer Actually Does
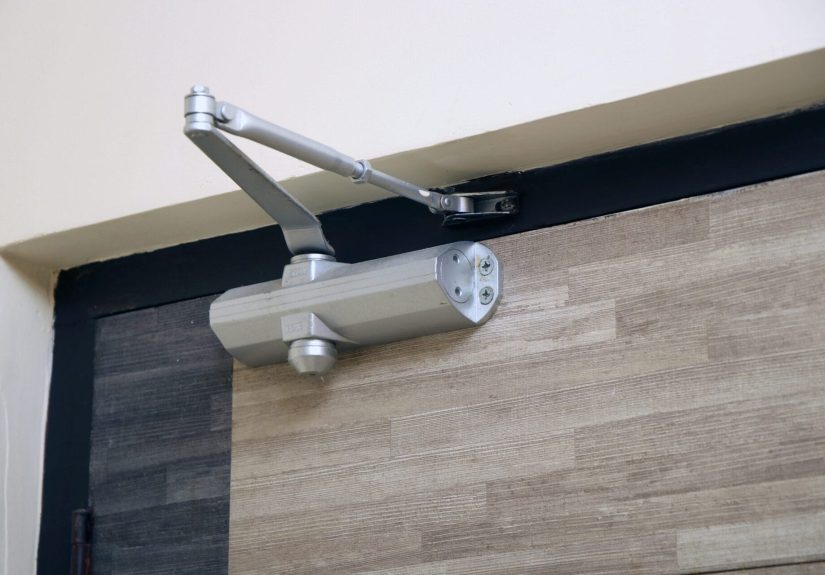
An automatic door closer uses spring tension and hydraulic control to return a door to the closed position after someone opens it. In plain English, it pulls the door shut without letting it slam like an angry teenager. Inside the closer body, hydraulic fluid controls the speed of the door through different parts of the swing cycle, usually including the main sweep and the final latch.
That final detail matters. A door can look “mostly closed” and still fail to latch, especially if weatherstripping, stack pressure, misaligned hinges, or a warped frame are working against it. A good closer balances two competing goals: the door should be easy to open, but it still needs enough closing force to latch every time.
Before You Buy: Pick the Right Closer
Before you grab a drill, make sure the closer matches the door. This is where many installs go sideways before the first screw even touches wood.
1. Match the closer to the door size and weight
Closers are rated by size or power. Heavier or wider doors need stronger closers. Exterior doors usually need more closing force than interior doors because wind, weatherstripping, and pressure differences make them harder to latch. If you undersize the closer, the door may close politely but never actually finish the job.
2. Decide on the mounting style
Most surface-mounted door closers can be installed in one of three ways:
- Regular arm mount: Installed on the pull side of the door. This is often the most power-efficient option and the simplest choice when appearance is not the top concern.
- Top jamb mount: Installed on the push side, with the closer body on the frame. This works well when the door’s top rail is narrow.
- Parallel arm mount: Installed on the push side, with the arm sitting roughly parallel to the door when closed. This looks cleaner and protects the arm better, but it is usually a little less efficient.
If that sounds like hardware-store poetry, here is the easy rule: follow the mounting style shown on the paper template that best matches your door swing, frame depth, and visibility preference.
3. Know whether the door is fire-rated
If you are working on a fire-rated door, slow down and read the label, the closer instructions, and the applicable code requirements. Do not install a mechanical hold-open arm on a fire-rated opening unless the system is specifically listed and designed for that purpose. Fire doors are not the place for guesswork, creative improvisation, or “close enough.”
4. Think about accessibility
If the door needs to be accessible, the closer cannot simply be cranked to maximum spring power and called a success. On accessible interior hinged doors, opening force and closing speed matter. A door that shuts like it is training for the Olympics may keep the building secure, but it can also create an access problem.
Tools and Materials You’ll Need
- Automatic door closer kit
- Paper template from the manufacturer
- Tape measure
- Pencil
- Drill and bits
- Screwdriver or driver bit set
- Wrench or adjustable wrench
- Level or speed square
- Safety glasses
- Step stool if needed
- Sex bolts or through-bolts if required for the door material
For hollow metal, aluminum storefront, or some composite-faced doors, the fasteners in the box may not be enough on their own. Always check the manufacturer’s instructions for reinforcement and fastener type. A closer is under tension. You want it attached to the door, not to your hopes.
How to Install an Automatic Door Closer
Step 1: Identify the hand and swing of the door
Stand on the side of the door where you will be mounting the closer. Note where the hinges are and whether the door pulls toward you or pushes away from you. This determines which template layout to use. Even universal, non-handed closers rely on the correct handing during installation.
If you skip this step, you can still finish the project. It will just be the wrong project.
Step 2: Choose the mounting position
Pick the mounting style that suits the door and frame:
- Use regular arm when you have room on the pull side and want the most efficient setup.
- Use top jamb when the push side frame gives you better placement or the door’s top rail is narrow.
- Use parallel arm when you want a tidier push-side installation and less exposed hardware.
Do not freestyle the measurements. Use the template that came with the closer. Manufacturers design the hole pattern and arm geometry very precisely, and a small layout error can make adjustment difficult or impossible.
Step 3: Tape the template in place
Cut out or unfold the paper template and align it exactly as directed. Usually that means referencing the hinge edge, top of door, frame stop, and the desired degree of opening. Tape it securely so it does not drift while you mark the holes.
This is the moment where patience saves you from saying, “Why does the arm look wrong?” forty minutes later.
Step 4: Mark and drill the holes
Mark all hole locations with a sharp pencil or punch. Then remove the template and drill pilot holes or prepare the door and frame for the required fasteners. Wood doors typically get pilot holes for screws, while metal doors may require machine screws, through-bolts, or tapped holes.
Double-check your depth before drilling. On some doors, you do not want to blast all the way through unless the hardware specifically calls for it.
Step 5: Mount the closer body
Attach the closer body to the door or frame, depending on the mounting style. Pay attention to the orientation of the adjustment valves and the spindle position. Many installation guides specify that the regulating valves face the hinge side or lock stile depending on the application. If the closer body goes on upside down or reversed, the rest of the assembly will fight you the whole way.
Tighten the screws firmly, but do not overtighten them into oblivion. Stripped fasteners turn a ten-minute task into a weekend subplot.
Step 6: Install the bracket, shoe, or parallel arm plate
Next, attach the arm shoe or bracket to the door or frame where the template indicates. On regular arm installations, this is usually on the frame face. On top jamb installs, it is usually on the top rail of the door. On parallel arm installs, you will mount a parallel arm plate to the underside of the frame.
Alignment matters here. If the bracket sits crooked, the arm will not track smoothly and the closer may bind before it ever gets a fair chance.
Step 7: Preload the spindle and attach the main arm
Many closers require you to rotate the spindle slightly, often about 45 degrees, before placing the main arm onto it. This preload creates the proper spring tension and arm geometry. Follow your template or installation sheet exactly for the direction of rotation and the reference mark on the arm.
This is one of the most technical-looking parts of the job, but it is manageable if you move slowly. Hold the spindle with a wrench, align the arm with the correct index mark, and secure it with the main arm screw.
Step 8: Connect the forearm and set the arm geometry
Reconnect the forearm or connecting rod to the main arm. Then adjust the rod length so the arm sits in the correct position when the door is closed. Depending on the mounting style, the forearm may need to be perpendicular to the door or set so the arm elbow sits about 1-1/2 inches from the door face.
This is not decorative. Correct arm geometry affects leverage, closing power, and how the closer behaves through the full swing.
Step 9: Install the cover
If your closer has a cover, snap or slide it into place after the mechanical parts are secure and the closer has been adjusted. Some people install the cover immediately. Veterans of door-closer installation tend to wait until the closer proves it can behave.
How to Adjust an Automatic Door Closer
Installation is only half the job. Adjustment is where the closer stops being a shiny metal object and starts acting useful.
Adjust the sweep speed
The sweep controls the main portion of the closing cycle, usually from the open position down to the last several inches before latching. Turn the sweep valve in small increments. Tiny turns matter. Big turns create drama.
Adjust the latch speed
The latch controls the final few degrees of movement, when the door has to pull past weatherstripping and actually catch the latch. Too slow, and the door stalls just before closing. Too fast, and it slams hard enough to announce itself three offices away.
Adjust the backcheck
Backcheck resists the door as it opens near the wide-open position. It helps prevent the door from flying open and smashing into a wall, person, or adjacent hardware. It is not a stop. If the door needs to be physically limited, use proper stopping hardware.
Adjust the spring power if needed
Some closers have adjustable spring power. Increase it only enough to achieve reliable latching. On accessible doors, avoid using spring power as a brute-force solution if the real problem is hinge friction, poor alignment, damaged weatherstripping, or pressure imbalance.
Accessibility and Code-Smart Tips
If you are installing a closer on an accessible interior door, make sure the door opens without excessive force and closes at a reasonable speed. A common benchmark is that the door should take at least five seconds to move from 90 degrees open to 12 degrees from the latch. The latch itself still needs enough snap to close fully, but the overall swing should not feel aggressive.
For interior accessible hinged doors, opening force should generally be kept low. Exterior hinged doors are a different story because wind, seals, and pressure often require more closing power. In those situations, a low-energy automatic operator may be the better answer than turning a manual closer into a shoulder workout.
If you are dealing with a powered low-energy operator, that system falls under a different standard than a typical manual hydraulic closer. It may involve push plates, knowing-act activation, electrical connections, signage, and commissioning requirements. In other words, do not treat a powered operator like a basic Saturday screwdriver project unless you are trained and working from the full product instructions.
Common Mistakes to Avoid
- Ignoring the template and eyeballing the hole locations
- Using the wrong mounting style for the door and frame conditions
- Installing the closer body in the wrong orientation
- Skipping spindle preload before attaching the arm
- Over-adjusting the valves in large turns
- Using backcheck as a substitute for a door stop
- Cranking up spring power when the real problem is hinge drag or frame misalignment
- Using a mechanical hold-open arm on a fire-rated door
Troubleshooting After Installation
The door won’t latch
Increase latch speed slightly, then reassess spring power. Also inspect hinges, strike alignment, weatherstripping, and whether the door is rubbing anywhere.
The door slams
Reduce latch speed first, then check sweep speed. Make small adjustments and test after each one.
The door is too hard to open
Reduce spring power if possible, then look for mechanical drag. Sticky hinges, warped frames, and tight gasketing can all make the closer seem harsher than it actually is.
The door flies open
Increase backcheck slightly and confirm you have a proper stop where needed.
Fluid is leaking
If hydraulic fluid is leaking, the closer is usually at or near the end of its useful life. Adjustment will not magically turn a leaking closer into a healthy one. Replacement is often the real solution.
Final Thoughts
Installing an automatic door closer is one of those projects that feels modest until you notice how much better the door behaves afterward. The right closer makes a door feel intentional. It closes with confidence, latches without drama, and stops announcing every entrance like a stage cue.
The key is simple: choose the correct closer, use the template exactly, set the arm geometry carefully, and make patient adjustments. Most bad door closer installations are not caused by bad hardware. They are caused by rushing, guessing, or trying to overpower a door that really needs alignment work. Take your time, and the result will feel far more professional than the difficulty level suggests.
Experience Notes: What Installing an Automatic Door Closer Is Really Like
In real life, installing an automatic door closer is less about heroic carpentry and more about respecting tiny details. The first experience most people have is surprise. The closer looked simple in the box, but the template has more lines than a subway map and the arm assembly appears to have been designed by someone who enjoys geometry a little too much. Then, once the layout starts making sense, the job becomes surprisingly satisfying.
One common experience is discovering that the door itself has been the real villain all along. You install the closer, expect instant perfection, and then notice the top corner rubs the frame, one hinge is loose, or the latch has been misaligned since approximately the previous decade. That moment is oddly useful. A closer magnifies existing problems. It forces you to see whether the door is square, whether the hinges are smooth, and whether the weatherstripping is putting up too much resistance. In that way, a door closer is part hardware, part honesty machine.
Another very typical experience is learning that “small adjustment” truly means small. The first time someone turns a sweep or latch valve a full revolution, the door responds like it has suddenly changed personality. A quarter turn is often plenty. The process becomes a rhythm: adjust, test, listen, repeat. You open the door, let it close, frown thoughtfully, make another tiny tweak, and suddenly start feeling like the kind of person who says things like “The latch phase is still a little hot.” That is how it gets you.
There is also the oddly memorable experience of the arm preload step. This is the part where many DIYers pause, reread the instructions, and wonder whether the closer is about to spring across the room like an offended grasshopper. In practice, it is manageable if you hold the spindle securely and move carefully. Once the arm lands on the correct index mark, the whole project starts to feel less mysterious.
On exterior doors, the biggest lesson is humility. Wind, pressure differences, seals, and seasonal movement can make a beautifully installed closer seem inconsistent from one day to the next. A door that behaves perfectly in mild weather might need a touch more force during winter or when stack pressure changes. That does not mean the install was wrong. It means exterior doors live dramatic lives.
And then there is the payoff. After the final adjustment, the door stops slamming. It no longer hangs half-open. It closes with a quiet, controlled motion that feels expensive, even when the closer itself was not. That is the experience people remember most. It is not flashy, but every trip through the doorway feels better. For a relatively compact project, that is a pretty great return.