Table of Contents >> Show >> Hide
- What Is an Anime Music Video?
- How to Make an Anime Music Video: 9 Steps
- Step 1: Choose a Clear AMV Concept
- Step 2: Pick the Right Song
- Step 3: Gather Your Anime Clips Responsibly
- Step 4: Choose Your Editing Software and Set Up the Project
- Step 5: Build a Rough Cut First
- Step 6: Sync Clips to the Beat, Lyrics, and Motion
- Beat Sync
- Lyric Sync
- Motion Sync
- Step 7: Add Transitions, Effects, and Visual Style
- Step 8: Polish the Audio, Pacing, and Final Details
- Step 9: Export, Upload, and Learn From Feedback
- Common AMV Mistakes to Avoid
- Best Types of AMVs for Beginners
- Advanced Tips for Better Anime Music Videos
- Extra Experience: What Making AMVs Teaches You
- Conclusion
Making an anime music video, better known as an AMV, is where editing skill meets fan passion, musical timing, and the very serious business of yelling “that frame was perfect!” at your screen at 1:37 a.m. A great AMV is not just anime clips glued to a song. It is a miniature music video with rhythm, emotion, structure, and enough visual punch to make viewers forget they were supposed to be doing homework, laundry, or literally anything else.
Whether you want to create a dramatic battle edit, a romantic character tribute, a comedy AMV, or a fast-paced anime montage for YouTube, TikTok, Instagram Reels, or a convention contest, the process is easier when you follow a clear workflow. This guide breaks down how to make an anime music video in 9 practical steps, from choosing the concept and music to syncing clips, polishing effects, exporting, and publishing responsibly.
Important note: AMVs often involve copyrighted anime footage and music. This guide focuses on creative, educational, and responsible editing practices. Always use legally obtained media, check licenses, give proper credit where needed, and understand that fair use depends on context. No editing trick magically guarantees permission, monetization, or protection from claims.
What Is an Anime Music Video?
An anime music video is a fan-made video that combines anime visuals with music to create a new emotional or narrative experience. Some AMVs retell a character arc. Others turn fight scenes into a beat-driven explosion of motion. Some are funny enough to make a villain look like they are starring in a pop breakup song, which is a noble art form in its own way.
The best AMVs usually have three things in common: a clear idea, strong timing, and editing choices that support the music instead of wrestling it like a confused raccoon. The goal is not to use every cool clip you own. The goal is to make the song and visuals feel like they were meant to exist together.
How to Make an Anime Music Video: 9 Steps
Step 1: Choose a Clear AMV Concept
Before opening your editing software, decide what your anime music video is really about. This is the step many beginners skip, which is why some first AMVs feel like a random buffet of sword swings, crying close-ups, and glowing eyeballs. Cool? Yes. Coherent? Not always.
Start with one simple concept. For example, you could make an AMV about a hero learning confidence, two rivals pushing each other forward, a team overcoming impossible odds, or a character slowly falling apart emotionally. You can also build around a mood: energetic, tragic, nostalgic, romantic, chaotic, or funny.
Ask yourself these questions:
- What emotion should the viewer feel by the end?
- Which anime, character, or relationship best fits that emotion?
- Is this AMV story-based, action-based, aesthetic, comedic, or character-focused?
- Will the video follow the lyrics, the beat, or both?
A focused AMV is easier to edit because every clip has a job. If your theme is “a lonely character finding strength,” a random beach episode scene may not help unless it secretly contains emotional symbolism or a dramatic sandwich.
Step 2: Pick the Right Song
The song is the backbone of your AMV. It controls pacing, tone, structure, and the viewer’s emotional expectations. Choose music that matches your concept instead of picking a song only because it is popular. A slow piano ballad can make a fight scene feel tragic. A high-energy rock track can turn training scenes into pure adrenaline. A playful electronic song can make slice-of-life anime feel like a sugar rush with subtitles.
Listen to the full song several times before editing. Notice the intro, verse, chorus, bridge, beat drops, quiet moments, and final hit. Mark the parts where the energy changes. These are your editing landmarks. A strong AMV often builds toward the chorus or a major lyric instead of throwing the biggest scene at the viewer in the first ten seconds like an overexcited fireworks salesman.
For copyright-safe options, consider music from royalty-free libraries, tracks you have permission to use, Creative Commons music with proper attribution, or original music. If you use commercial music, understand that your video may receive claims, restrictions, muting, blocking, or takedown requests depending on the rights holder and platform rules.
Step 3: Gather Your Anime Clips Responsibly
Once you know the concept and song, gather clips that support the story. Do not simply grab every flashy scene from the anime. Instead, collect moments that match specific parts of the music. For example, soft expressions may fit the intro, fast movement may fit percussion-heavy sections, and emotional close-ups may hit harder during the chorus or bridge.
Use legally obtained footage whenever possible. Keep your media organized in folders such as “intro,” “chorus,” “fight scenes,” “emotional scenes,” “funny reactions,” and “ending shots.” Future-you will be grateful. Future-you has already suffered enough.
Clip selection is where many AMVs are won or lost. A scene does not need to be visually loud to be powerful. Sometimes a simple glance, hand movement, or quiet shot of a character walking away can hit harder than a city-sized laser beam. Match the clip to the music’s emotional meaning, not just its volume.
Step 4: Choose Your Editing Software and Set Up the Project
You can make an AMV with many different video editors. Popular choices include Adobe Premiere Pro, DaVinci Resolve, Final Cut Pro, CapCut, After Effects, Vegas Pro, and mobile editing apps. Beginners may prefer CapCut or DaVinci Resolve because they are approachable and powerful. More advanced editors may combine Premiere Pro or DaVinci Resolve with After Effects for motion graphics, masking, shakes, typography, and heavier visual effects.
Set up your project before cutting. Use a common video size such as 1920 x 1080 for YouTube or 1080 x 1920 for vertical platforms. Match the frame rate to your footage when possible, commonly 24, 30, or 60 frames per second. Import your song first, then place it on the timeline and lock the audio track so you do not accidentally move it. Accidentally shifting your song by three frames is how editors discover new forms of emotional weather.
Turn on audio waveforms if your editor supports them. Waveforms help you see beats, hits, pauses, and loud moments. Add markers on major beats, chorus entries, lyric changes, and dramatic accents. This simple preparation makes beat sync much easier.
Step 5: Build a Rough Cut First
The rough cut is your first complete version. It does not need to be beautiful. In fact, it may look like a raccoon edited it during a thunderstorm. That is normal. The rough cut is only meant to test whether your clips, song, and idea work together.
Start by placing your strongest story beats across the timeline. Put your opening scene where the mood begins, your most powerful clips near the chorus or climax, and your final image at the end. Then fill in the gaps with supporting clips. Keep the structure simple: intro, build-up, peak, release, ending.
Do not add too many effects yet. Beginners often try to hide weak timing with flashes, shakes, zooms, and transitions. Effects can enhance an AMV, but they cannot rescue a confusing edit. First, make the video work with clean cuts. If the AMV feels good without effects, it will feel even better once polished.
Step 6: Sync Clips to the Beat, Lyrics, and Motion
Sync is the magic sauce of an anime music video. There are several kinds of sync, and the best AMVs often combine them.
Beat Sync
Beat sync means cutting or changing visuals on musical beats. This works especially well for action AMVs, dance edits, and fast montages. You can cut on drum hits, bass drops, claps, or percussion patterns. If every cut lands slightly late, viewers may not know why the edit feels wrong, but they will feel it. Timing is sneaky like that.
Lyric Sync
Lyric sync means matching visuals to the meaning of the words. If the lyric says “falling,” you might show a character falling emotionally, physically, or symbolically. Avoid being too literal all the time. A lyric about “fire” does not always need actual flames. It could show anger, ambition, destruction, or someone making bad decisions with heroic lighting.
Motion Sync
Motion sync means matching movement inside the anime clip to the rhythm. A punch, blink, sword swing, hair flip, jump, or camera pan can land on a beat. This creates a satisfying connection between the music and animation. Motion sync often looks more professional than simply cutting every half-second.
For smoother AMV editing, trim clips so the most important motion lands exactly on the beat. Use speed ramps carefully to make actions hit musical accents. Just avoid stretching footage so much that characters start moving like haunted rubber bands.
Step 7: Add Transitions, Effects, and Visual Style
After the rough cut and sync feel solid, start adding style. Transitions and effects should support the music, not fight it for custody of the viewer’s eyeballs. Good AMV effects include clean zooms, flashes, motion blur, masking, match cuts, glow, color correction, camera shakes, typography, and overlays.
Use transitions with intention. A white flash can emphasize a drum hit. A zoom can increase energy. A match cut can connect two similar poses from different scenes. A fade can soften a sad moment. If every transition is huge, none of them feel special. It becomes visual yelling, and the viewer’s brain may politely leave the room.
Color correction also matters. Anime episodes may vary in brightness, contrast, and color tone. Adjust clips so they feel like they belong in the same AMV. For emotional videos, warmer or cooler tones can strengthen the mood. For action videos, slightly stronger contrast can add impact. Keep skin tones and key details readable.
Step 8: Polish the Audio, Pacing, and Final Details
Even though AMVs are visual, audio polish still matters. Keep the song clean, avoid accidental audio gaps, and fade in or fade out if needed. If you add sound effects, use them lightly. Sword hits, whooshes, impacts, and risers can add energy, but too many can make the video sound like a kitchen drawer falling down stairs.
Watch your AMV from start to finish without stopping. Then watch it again with fresh eyes. Look for clips that stay too long, cuts that feel early or late, effects that distract, or moments where the energy drops unintentionally. A strong AMV has rhythm even when the song slows down. Quiet sections should feel controlled, not empty.
Add titles only if they help. A simple opening title or ending credit can work, but avoid covering important character faces with giant text unless the text is part of the style. If you upload publicly, include credits in the description for the anime, song, artist, editor, and any resources that require attribution.
Step 9: Export, Upload, and Learn From Feedback
For YouTube, a common export choice is MP4 with H.264 video and AAC audio. Keep the same frame rate as your project, use progressive scan, and export at high quality. For 1080p AMVs, a strong bitrate helps preserve detail during fast motion, especially in action scenes with particles, speed lines, and dramatic anime dust clouds that appear whenever someone breathes near a battlefield.
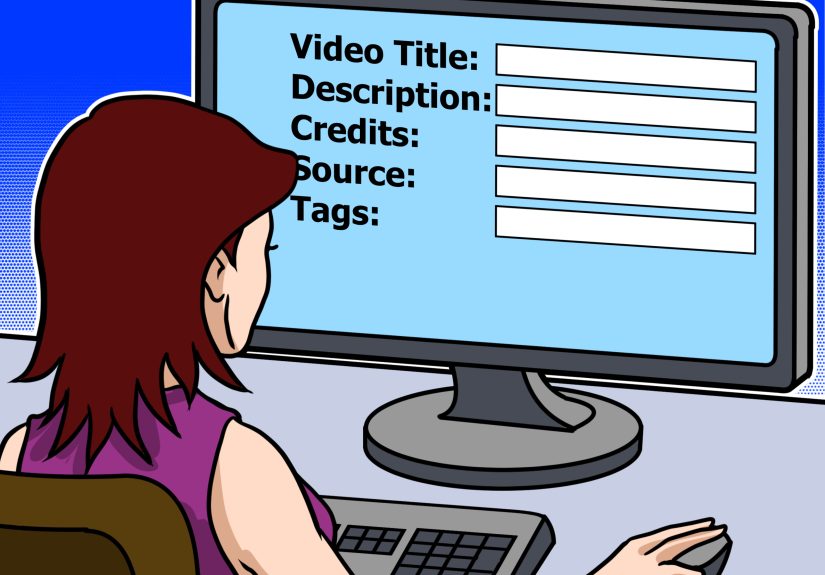
When uploading, write a clear title that includes the anime name, song name, and “AMV” if appropriate. Add a helpful description, credits, and tags. Create a thumbnail that is readable, emotional, and not overly crowded. The best thumbnail usually has one strong character image, expressive lighting, and a title short enough to read on a phone.
After publishing, study audience retention and comments. Do viewers leave during the intro? Maybe it is too long. Do people replay the chorus? Great, your payoff worked. Do comments say the timing feels clean? Congratulations, you have pleased the beat-sync spirits. Use each AMV as practice for the next one.
Common AMV Mistakes to Avoid
Using Too Many Random Clips
An AMV should feel intentional. Random cool scenes may impress for five seconds, but a clear emotional direction keeps people watching.
Overloading Effects
Effects should season the edit, not become the entire meal. If your AMV looks like five editing plugins had a pillow fight, simplify.
Ignoring Song Structure
Every song has energy changes. Use them. Save your biggest visual moments for the strongest musical moments.
Weak Clip Quality
Low-resolution, blurry, or badly cropped footage can make a good edit look unfinished. Start with the best legal source quality you can access.
Forgetting Copyright and Attribution
Always think before uploading. Use licensed or permission-friendly materials when possible, credit creators, and understand that public platforms have copyright systems and policies.
Best Types of AMVs for Beginners
If this is your first anime music video, try a simple format before attempting a complex cinematic masterpiece with 87 masks and a timeline that looks like spaghetti. Good beginner AMV ideas include a single-character tribute, a friendship montage, a training arc edit, a short action chorus edit, or a romantic mood video.
Shorter projects are often better for learning. A 30-second AMV can teach timing, clip choice, and effects faster than a four-minute project that slowly becomes a digital swamp. Once you build confidence, you can make longer edits with more advanced storytelling.
Advanced Tips for Better Anime Music Videos
Create Contrast
Do not keep the same energy level the entire time. Mix fast cuts with slower moments. Let quiet scenes breathe before a major drop. Contrast makes the big moments feel bigger.
Use Match Cuts
A match cut connects two shots with similar motion, shape, color, or composition. For example, one character raising a hand can cut to another character swinging a sword in the same direction. This makes your AMV feel smooth and deliberate.
Edit for Emotion, Not Just Speed
Fast editing is exciting, but emotion creates memory. Give viewers a reason to care. Even action AMVs benefit from a small story: struggle, rise, clash, victory.
Keep a Project Folder Template
Create folders for footage, music, exports, thumbnails, project files, and credits. Organized editors spend more time creating and less time searching for “final_final_real_final_v7.mp4.”
Extra Experience: What Making AMVs Teaches You
Making an anime music video teaches patience faster than almost any beginner editing project. At first, you may think the process is simple: choose a song, drop in clips, add transitions, become internet-famous, retire early. Then you realize that one sword swing is two frames late, the chorus needs stronger scenes, the export looks softer than expected, and your timeline has become a tiny civilization with its own traffic laws.
One of the biggest lessons is that editing is mostly decision-making. You are not just asking, “Is this clip cool?” You are asking, “Does this clip belong here?” That difference changes everything. A scene can be amazing and still be wrong for the moment. Maybe it breaks the mood. Maybe the motion goes against the rhythm. Maybe the character expression does not match the lyric. Cutting a favorite clip can feel painful, but it often makes the AMV stronger.
Another important experience is learning how music breathes. Beginners often cut on every beat because it feels energetic. After a while, you discover that silence, pauses, and held shots can be just as powerful. If the singer pauses before a big line, holding on a character’s face can build tension. If the beat drops suddenly, a clean impact cut can feel better than five random flashes. Good AMV editing is not about constant movement. It is about controlled movement.
You also learn that effects are more impressive when they have a reason. A camera shake on every beat gets old quickly. A shake on the exact moment a punch lands can feel fantastic. A glow effect on every scene looks like the characters are trapped inside a neon toaster. A glow effect during a transformation or emotional climax can look intentional. Restraint is not boring; restraint is what makes the flashy parts shine.
Feedback is another part of the journey. Some viewers will notice your timing. Some will praise the song choice. Some will ask what anime you used even though it is written in the title, description, tags, thumbnail, and possibly carved into the moon. Take useful feedback seriously, but do not let every comment rewrite your style. Your goal is to improve while keeping your creative voice.
AMV editing also builds transferable skills. You learn video pacing, audio analysis, story structure, color matching, typography, exporting, thumbnail design, and platform optimization. These skills can help with YouTube videos, short-form content, trailers, school projects, social media edits, and even professional video work later. In other words, that three-hour session syncing anime clips to a guitar solo was not procrastination. It was multimedia training wearing a hoodie.
Finally, making AMVs teaches you to finish. Many editors start projects and abandon them once the excitement fades. Finishing an AMV, even an imperfect one, is valuable. Every completed project gives you something to review, share, and improve from. Your first AMV may not be legendary. It may have awkward cuts, loud effects, and a thumbnail that looks like it was assembled during a sneeze. That is fine. The next one will be better because you made the first one.
The best AMV editors are not the ones who never make mistakes. They are the ones who keep editing, keep studying music, keep refining timing, and keep caring about the emotional connection between sound and image. Start small, stay organized, respect the media you use, and enjoy the process. When the right clip lands on the right beat, you will understand why AMV editing is so addictive.
Conclusion
Learning how to make an anime music video is part technical skill, part storytelling, and part joyful obsession. Start with a clear concept, choose music that fits, gather clips responsibly, build a rough cut, sync visuals to the beat and lyrics, polish your effects, export properly, and learn from every upload. A good AMV does not need the most complicated software or the flashiest transitions. It needs intention, rhythm, emotion, and enough patience to move a clip two frames to the left without declaring war on your computer.
If you are new to AMV editing, begin with a short project and focus on clean timing. Once you understand pacing and structure, effects become easier to use well. Keep practicing, keep experimenting, and remember: the timeline may look scary, but it is just a puzzle with music.