Table of Contents >> Show >> Hide
- What the RD6006W Is (and Isn’t)
- Key Specs at a Glance
- Build, Layout, and “Does It Feel Annoying to Use?”
- Performance on the Bench
- Wi-Fi and USB Control: The “W” Advantage
- Features You’ll Actually Use (Not Just Brag About)
- Limitations and Gotchas
- How It Compares to Other Bench Supply Options
- Who Should Buy the RD6006W?
- Setup Tips to Get the Best Results
- Conclusion
- Real-World Experiences With the RD6006W (What You’ll Notice After the Honeymoon)
- SEO Tags
If you’ve ever looked at your bench and thought, “I need a power supply that’s smarter than me, but also cheaper than my last impulse buy,”
the Riden RD6006W tends to show up in the recommendations. It’s not a traditional, heavy metal, plug-it-into-the-wall lab supply. Instead,
it’s a digitally controlled DC-DC buck power supply module that turns an external DC source (a “brick,” server PSU, or DC supply you already own)
into a surprisingly full-featured bench supply with constant-voltage (CV) and constant-current (CC) modes.
The “W” part is the fun twist: Wi-Fi control. In theory, it means you can tweak voltage limits from across the room. In practice, it means you’ll
absolutely open the app just to watch the graphs move because we’re all the same person on the inside.
What the RD6006W Is (and Isn’t)
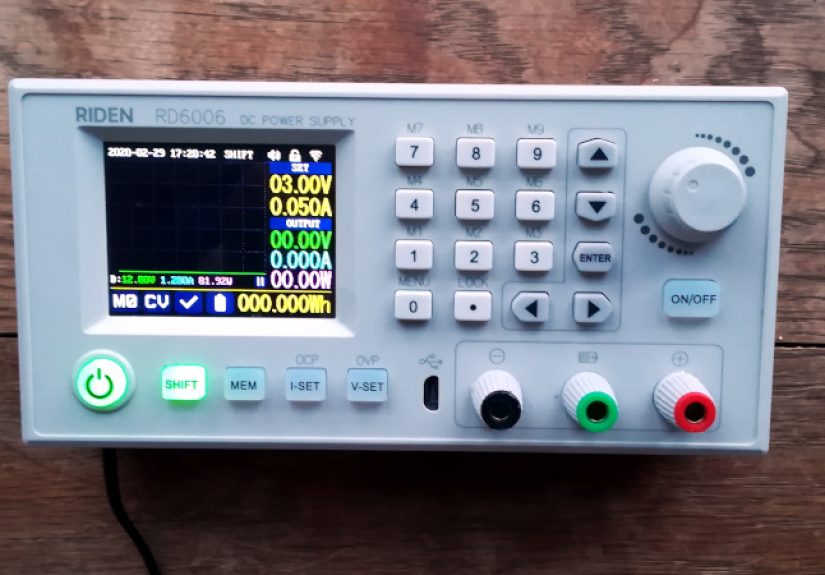
The RD6006W is best described as a “bench supply brain” attached to a high-power buck converter. You supply DC input power, it regulates that power
into an adjustable output, and it gives you a front panel that feels closer to real lab gear than the tiny “eBay module with two buttons” era.
You get a color screen, a rotary encoder, a keypad for direct entry, memory presets, protection settings, and remote control options.
What it isn’t: a complete mains-powered supply out of the box. You must provide a suitable DC input supply, and because it’s a buck converter,
it can only step voltage down. No boosting. No magic. If you try to pull 60 V out of a 48 V input, the RD6006W will simply stare at you with
the calm disappointment of a multimeter that’s seen things.
Key Specs at a Glance
Specs can vary slightly by kit and documentation, but the “headline” capabilities are consistent:
- Input range: typically 6–70 V DC (from an external power source)
- Output range: 0–60 V DC
- Output current: 0–6 A
- Max output power: up to about 360 W (limited by your input supply and headroom)
- Modes: CV/CC with adjustable protection thresholds (OVP/OCP/OTP)
- Interface: front-panel controls plus USB; Wi-Fi on the “W” variant
- Display: 2.4-inch color LCD with multiple display styles (including a “curve” view)
- Quality-of-life extras: preset storage/recall, energy/capacity counters, battery charging terminal, optional temp sensor support
One spec that matters in real life: headroom. As a buck converter, it needs the input voltage to be higher than the desired output voltage.
In many published specs, the buck requirement is described as needing more than ~1 V and more than ~10% above the target output. Translation:
if you want a stable 30 V output, you’ll be happier feeding it something like 36–48 V than trying to squeak by with 31 V.
Build, Layout, and “Does It Feel Annoying to Use?”
The RD6006W’s front panel is where it wins people over. You get a rotary encoder for quick changes, plus a keypad for direct numeric entry.
That combo is a big deal. It’s the difference between “I guess I’ll spin this knob for 40 seconds” and “12.60 volts, thank you, next.”
The screen is large enough to be readable from normal bench distance, and the interface generally behaves like it was designed by someone who
has actually used a power supply before. Presets make it practical for repeat worklike always needing 5.1 V for microcontroller projects,
12 V for fans, or a current-limited 4.2 V profile for battery-related tasks.
There are also small “lab-ish” touches that feel surprisingly mature for the price category, like fusing provisions and support for timekeeping
(often via a small coin cell socket in some variants/kits). It’s not glamorous, but neither is losing your settings every time you unplug a supply.
Performance on the Bench
CV/CC behavior and regulation
In normal hobbyist and light lab usepowering boards, running small motors within reason, testing LED strips, feeding DC loadsthe RD6006W does what
you want a programmable supply to do: hold voltage in CV mode until the load demands more than the current limit, then transition into CC mode.
Published documentation typically calls out millisecond-scale response times and decent load regulation figures, which lines up with the general
“this feels like a real instrument, not a gimmick” consensus in the maker community.
The practical caveat is universal: performance depends on the quality of your input supply and wiring. A stiff, well-rated DC input (like a good
server PSU) plus short, appropriately thick leads will make the RD6006W behave better than a bargain bin brick plus spaghetti wiring.
Noise, ripple, and the “switching supply reality tax”
The RD6006W is a switching regulator. That’s how it delivers high power in a compact module without becoming a space heater in your workshop.
The trade-off is output ripple and switching noise. Some documentation lists typical ripple in the “tens to around a hundred millivolts peak-to-peak”
range depending on conditions, and independent reviewers generally treat it as “usable for most things, not a precision ultra-low-noise source.”
If you’re powering sensitive analog circuits, RF front ends, or audio experiments where noise becomes the plot, plan on mitigation:
add extra output capacitance (within reason), consider an LC filter, keep leads short, andwhen neededpost-regulate with a linear stage for the last
bit of cleanliness. The RD6006W can be an excellent “pre-regulator” even if it’s not the final word in low-noise power.
Protection features and safety behavior
The RD6006W’s protection controls are a major value feature: over-voltage protection (OVP), over-current protection (OCP), and over-temperature behavior (OTP)
are all things you normally expect on more expensive supplies. Add in the fact that many assemblies include fusing points, and you get a setup that can be
forgiving when you’re prototypingaka when mistakes are not “if,” but “how creative.”
One nuance: because this is a non-isolated buck topology, the output negative is typically tied to the input negative. That’s normal for this class of device,
but it matters if you expect an isolated, floating output like some traditional bench supplies. For most hobby work it’s fine; for certain measurement setups
and grounding-sensitive tasks, it changes how you plan your connections.
Wi-Fi and USB Control: The “W” Advantage
The RD6006W’s Wi-Fi control is the headline upgrade over the base model. Setup is generally described as a “configure and join your network” process,
and once connected, the phone app typically mirrors front-panel control while adding genuinely useful extrasespecially graphing and logging.
This is the sort of feature that sounds silly until you’re doing a battery discharge test and realize you’d love a record of voltage/current over time
without babysitting a notebook like it’s 1987.
USB control expands the possibilities further: PC software, automation scripts, and integration into test rigs. The maker ecosystem has produced
third-party tools and libraries that treat the RD60xx series like a controllable instrument rather than a “black box.”
If you like automation, this is the rabbit hole where you start saying things like, “It’s not overkill; it’s repeatability.”
A realistic note: vendor software experiences can vary. Some community reports mention antivirus warnings or false positives with certain downloads.
The safe approach is boring but effective: download only from trusted sources, scan files, and consider community-maintained tooling if you’re the
kind of person who already trusts GitHub more than mystery ZIP files.
Features You’ll Actually Use (Not Just Brag About)
Preset storage and quick recall
Presets turn the RD6006W into a “workflow” tool. Store common setups (5 V with a 0.5 A limit for dev boards, 12 V at 2 A for fans, 24 V for certain
industrial sensors) and you can move faster with fewer “oops I forgot the current limit” moments.
Battery charging terminal
The dedicated battery charging terminal is one of those features that’s either incredibly handy or totally ignored, depending on your projects.
In CC/CV charging workflows, it can serve as a controlled charger for certain scenariosbut it should be treated with respect. Batteries are not forgiving,
and “I’ll just wing it” is a phrase that pairs poorly with lithium chemistry. Use proper settings, verify polarity, and treat charging as a supervised activity,
not a background hobby.
Energy and capacity counters
Having the supply count amp-hours (Ah) and watt-hours (Wh) during a run is more useful than it sounds. It’s perfect for quick comparisons:
“How much energy did that motor test actually consume?” “How long does this load run before voltage sags?” It’s not lab-grade metrology, but it’s
absolutely good enough to inform decisions.
Limitations and Gotchas
- You’re responsible for the input supply. The RD6006W is only as capable as what you feed it. A 60 V / 6 A dream requires a properly
rated input source and enough voltage headroom. - Buck only. It steps down. If your project needs higher voltage than your input, you’ll need a different topology.
- Switching noise exists. For most digital and power projects, it’s fine. For ultra-sensitive analog work, plan filtering or a different supply.
- Not necessarily isolated. If you need floating outputs, series/parallel tricks, or certain measurement configurations, plan accordingly.
- Software ecosystem is a mixed bag. The best experience often comes from cautious sourcing and (if you’re inclined) community tooling.
How It Compares to Other Bench Supply Options
Compared to bargain “complete” bench supplies, the RD6006W often wins on interface and flexibilityespecially if you already have a solid DC source to pair with it.
Compared to higher-end lab supplies, it’s a value play: you get a lot of features, but you’re not buying certified isolation, premium low-noise performance,
or the kind of support that comes with established test-equipment brands.
Compared to smaller programmable modules (the ones with tiny displays and minimalist controls), the RD6006W feels like the “grown-up” version:
easier direct input, better readability, more practical protection settings, and stronger community momentum around automation and firmware tooling.
Who Should Buy the RD6006W?
The RD6006W makes the most sense if you:
- Want a capable adjustable supply without paying “lab brand” pricing.
- Like the idea of presets, logging, and remote control for repeat testing.
- Already own (or are willing to source) a suitable DC input supply.
- Build, repair, or prototype enough that CC limiting and OVP/OCP will save you from yourself.
You might look elsewhere if you:
- Need ultra-low-noise rails as your primary use case.
- Require an isolated output for your workflow.
- Want a single, wall-powered box with mainstream certification and minimal DIY decisions.
Setup Tips to Get the Best Results
Pick the right input supply
Choose a DC input source with enough voltage headroom for your highest intended output and enough current capacity for your load. For many users,
a quality 48 V supply is a sweet spot for general electronics work (where you rarely need 60 V output). If you truly need the top end, plan accordingly
with a higher-voltage input.
Don’t cheap out on wiring
Thick, short leads reduce voltage drop and improve stability. If you’re pulling several amps, use appropriate wire gauge and solid connectors.
“Mystery alligator clips from the drawer” are fun until they become a heating element.
Plan for airflow
High power means heat. Make sure the enclosure (if used) has ventilation and that the fan can do its job. Heat doesn’t just reduce comfortit can
reduce output capability and long-term reliability.
Conclusion
The Riden RD6006W lands in a rare sweet spot: it’s affordable, feature-rich, and genuinely pleasant to operate. It’s not pretending to be a premium
instrument, but it also doesn’t feel like a toy. If you accept the “bring your own DC input” modeland you’re okay with the realities of a switching
regulatorthis module can become the power supply you reach for first. Not because it’s the fanciest, but because it’s the one that quietly makes
your bench life easier.
Real-World Experiences With the RD6006W (What You’ll Notice After the Honeymoon)
After the first week, the RD6006W tends to stop being “a cool new gadget” and starts becoming “the thing you turn on without thinking.”
A common experience is how quickly presets change your workflow. You’ll set up a handful of saved profiles5 V for microcontrollers, 9 V for pedals,
12 V for fans and relays, maybe a current-limited 4.2 V for battery experimentsand suddenly your bench feels more organized even if it absolutely isn’t.
(The pile of jumper wires remains undefeated, but at least the voltage is correct.)
Makers often notice the RD6006W is especially good for iterative prototyping. For example, when you’re bringing up a new board, you can set a cautious
current limit and creep upward. That “soft landing” is the difference between a quick diagnosis and releasing the Magic Smoke™ that your board was
apparently storing for a special occasion. The CC mode becomes a built-in safety net: if something is shorted, the supply doesn’t instantly crater the
projectit tells you something’s wrong while keeping the situation (mostly) under control.
The Wi-Fi app experience is usually split into two phases. Phase one: “Neat, I can change settings from my phone.” Phase two: “Oh wait, the graphs and
logging are the real benefit.” People who do long testsbattery discharge curves, burn-in runs, LED thermal checkstend to appreciate being able to glance
at trends instead of staring at a static number. Even if you’re not doing formal data analysis, it’s helpful to see if current is drifting, voltage is sagging,
or a load is behaving unpredictably over time.
Another very typical experience: discovering the limits of your input supply in the most obvious way possible. You’ll try to run a higher voltage or higher
current load and realize the module is doing its job perfectly… but your external PSU is tapping out. That’s not the RD6006W failingit’s it being honest.
Many users end up upgrading their input supply after they fall in love with the interface, because the module makes it tempting to push projects further.
Noise and ripple usually show up as a “depends what you’re powering” moment. For digital electronics and motors, it’s rarely an issue. For sensitive analog,
you may notice hum, jitter, or unexpected behavior. The practical experience here is that the RD6006W often becomes your high-power adjustable source, while
a small linear regulator (or a dedicated low-noise supply) handles the few tasks where power purity matters more than power capability.
This isn’t a flaw so much as a normal division of labor on a well-equipped bench.
Finally, there’s the experience of customization and community. If you enjoy tinkering, you’ll find yourself exploring firmware tools, automation scripts, and
integrations. Even if you never go full “automated test rack,” it’s satisfying to know the module can grow with you: today it’s a bench supply,
tomorrow it’s part of a repeatable test routine. The RD6006W’s biggest real-world perk is that it meets you where you arewhether that’s “I just need stable
power” or “I want my power supply to be part of my workflow.”