Table of Contents >> Show >> Hide
- Why the Wii U Needs External Storage in the First Place
- Way 1: Choose the Right External Hard Drive Before You Plug In Anything
- Way 2: Power the Drive Properly So the Wii U Does Not Throw a Tantrum
- Way 3: Connect the Drive the Safe Way and Let the Wii U Format It
- Way 4: Use Data Management to Move Games and Organize Storage Like a Pro
- Way 5: Keep the Setup Stable for Long-Term Use
- Common Mistakes to Avoid
- Real-World Experience: What It Is Actually Like to Use an External Hard Drive on Wii U
- Final Thoughts
- SEO Tags
If your Wii U is starting to groan under the weight of eShop games, updates, DLC, and save files, welcome to one of the console’s most relatable problems: it never had much room to begin with. The good news is that adding an external hard drive to a Wii U is not complicated. The slightly less glamorous news is that the console has opinions. Strong opinions. It wants the drive formatted its way, powered correctly, and treated like a permanent roommate rather than a casual guest.
This guide walks through five smart ways to set up an external hard drive on Wii U, from choosing the right drive to formatting it properly and keeping it stable over the long haul. Along the way, we will cover the little details that trip people up, like why flash drives are a bad idea, why a Y-cable exists, and why the Wii U gets weirdly possessive once it formats a drive. Think of this as the practical, no-nonsense setup guide with just enough personality to keep you awake during the storage-management part.
Why the Wii U Needs External Storage in the First Place
The Wii U shipped with limited internal storage, which was fine until digital downloads, patches, and downloadable content started piling up like laundry on a chair. A single game update may not look scary on paper, but once you add multiple full games, DLC packs, and save data, the system’s internal memory can run out faster than you expect.
That is why a Wii U external hard drive is still one of the most practical upgrades for the console. A properly configured USB storage device gives you more room for full games, apps, updates, save data, and extra downloadable content. Better yet, once it is set up, the Wii U will usually use that external storage as the default home for new downloads, which makes life much easier.
Way 1: Choose the Right External Hard Drive Before You Plug In Anything
The first step in a successful Wii U HDD setup is choosing a drive the console can actually live with. This is where many people make the classic mistake of grabbing whatever old USB stick is sitting in a drawer and hoping for the best. The Wii U is not impressed by that kind of optimism.
Go with a real external drive, not a flash drive
For long-term use, an actual external hard drive is the better pick. Flash drives may seem convenient, but they are not ideal for repeated rewrites and long-term game storage. If you care about your downloaded library and save files, treat a thumb drive like a temporary convenience, not a permanent solution.
HDD or SSD?
An SSD can work in many cases, but the sweet spot for most Wii U owners is still a traditional external HDD. Why? Price and practicality. Since the Wii U uses USB 2.0 and tops out at older transfer speeds, you will not fully enjoy the speed advantage that makes external SSDs so exciting on newer devices. In plain English: paying extra for a super-fast drive on a Wii U is a little like putting racing tires on a shopping cart.
If you already own an SSD, fine, use it. But if you are buying specifically for the Wii U, a reliable external hard drive with enough capacity and stable power is often the more sensible option.
Capacity matters, but bigger is not always better
A 500GB or 1TB drive is usually more than enough for most Wii U collections. The system can recognize very large drives, but only up to 2TB of storage is actually usable. So if you hook up a monster drive with extra capacity beyond that, the Wii U will politely ignore the extra space like it never existed.
Way 2: Power the Drive Properly So the Wii U Does Not Throw a Tantrum
This is the part many first-time users skip, and it is also the part that explains half the internet’s “Why is my Wii U drive disconnecting?” stories.
Self-powered drives are the easiest option
The most reliable setup is an external hard drive with its own power adapter. Nintendo has long recommended a drive with a dedicated power source because it provides steadier performance. In real life, that means fewer random disconnects, fewer recognition issues, and fewer moments where the console acts like your drive suddenly became a stranger.
What if your drive is bus-powered?
Some portable drives pull power through USB alone. The problem is that certain bus-powered drives need more juice than a single Wii U USB 2.0 port can reliably provide. That is why many users turn to a Y-cable. One end carries data and power, while the second USB plug pulls extra power from another port on the console.
If you are using a bus-powered drive and the Wii U seems flaky about detecting it, a Y-cable is often the fix. It is not glamorous, but it works. It also makes your setup look slightly more dramatic, which may or may not be a bonus depending on your tolerance for cable spaghetti.
Skip unpowered hubs when possible
If you need extra USB connectivity, powered accessories are safer than bus-powered ones. The Wii U likes stable power. A weak hub feeding a power-hungry drive is asking for trouble. When in doubt, plug the drive directly into the console.
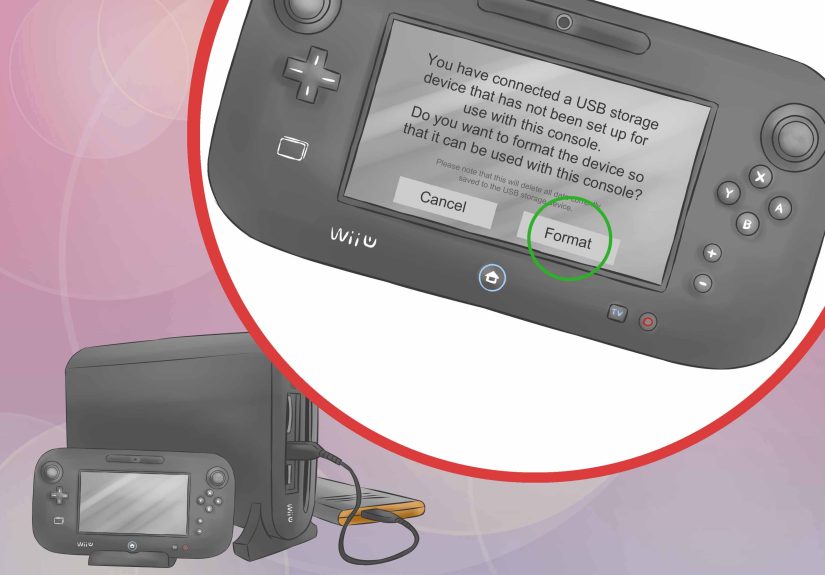
Way 3: Connect the Drive the Safe Way and Let the Wii U Format It
Once you have the right drive, it is time to connect it properly. This part is simple, but it comes with one important rule: turn the console off before connecting or disconnecting the storage device. The Wii U does not support hot-swapping for external storage, and pulling a drive while data is being read or written is a great way to invite corruption, frustration, or both.
How to connect and format the drive
- Power off the Wii U.
- Connect the external drive to one of the Wii U’s USB ports.
- If the drive uses its own power adapter, make sure it is plugged in and powered on.
- Turn on the Wii U.
- When prompted, choose to format the USB storage device.
If the format prompt does not appear automatically, head to System Settings, then Data Management, and select the option to format or configure the USB storage device. Be warned: formatting erases everything already on that drive.
What formatting means on Wii U
Once the Wii U formats an external drive, that drive becomes dedicated to that specific console. You cannot just unplug it and use it on a PC or Mac like nothing happened. You also cannot move it to another Wii U and expect instant friendship. To use it elsewhere, you would need to reformat it again, which wipes the data.
That is the Wii U’s version of commitment. It is not casual.
Way 4: Use Data Management to Move Games and Organize Storage Like a Pro
After formatting, the drive is not just extra space. It becomes part of your everyday Wii U storage routine. In many cases, new downloads will default to the external drive, which is exactly what most people want.
How to move data to the external drive
Open System Settings, go to Data Management, then choose Copy/Move/Delete Data. From there, you can move content from internal storage to USB storage, or copy and manage certain items depending on the content type and system version.
This is especially helpful if your internal memory is already crowded. Moving larger downloads and digital titles to the external hard drive can free up internal space and make future installs less annoying.
Check your space before downloading something giant
The Wii U also lets you check remaining space in Data Management. Do this before downloading a large title, especially if you have a modest-size drive or a library full of updates. Nothing kills momentum quite like deciding to grab a new game and then being told your storage is full because you forgot that one enormous update from three years ago.
Remember: one active USB storage device at a time
The Wii U can only actively use one USB storage device at a time for downloads and game access. You can own more than one drive, but swapping between them requires shutting the system down first. This is not a modern plug-and-play ecosystem. This is legacy-console storage management, where patience is part of the user interface.
Way 5: Keep the Setup Stable for Long-Term Use
Once your USB storage device on Wii U is working, the goal is simple: do not accidentally break a good thing.
A few habits that help
- Do not unplug the drive while the console is reading or writing data.
- Power the Wii U off fully before disconnecting the drive.
- Keep the drive in a spot where the cable will not get tugged, bent, or kicked.
- Label your Y-cable if your setup looks like a tiny octopus behind the TV.
- Avoid using random old flash drives as a “temporary” long-term solution.
If the drive is not detected
Start with the boring fixes first, because the boring fixes are often the right ones. Check the cable. Check the power supply. If you are using a portable drive, try a proper Y-cable. Make sure the drive is connected before the console powers on. If the drive was previously used elsewhere, expect to format it for Wii U use.
If you are still troubleshooting, remember that the issue is often power-related rather than a dead drive. The Wii U is famously particular about external storage power, and that little detail solves more mysteries than people want to admit.
Common Mistakes to Avoid
There are a few setup blunders that show up again and again:
- Using a thumb drive for permanent game storage: tempting, cheap, and not a great long-term idea.
- Forgetting that formatting wipes the drive: always back up anything important first.
- Expecting the drive to work on a PC after Wii U formatting: it will not, unless you reformat it again.
- Assuming every portable drive gets enough power from one USB port: many do not.
- Unplugging the drive while the console is on: this is the digital equivalent of yanking a tablecloth and hoping the dishes stay put.
Real-World Experience: What It Is Actually Like to Use an External Hard Drive on Wii U
In actual day-to-day use, setting up an external hard drive on Wii U feels less like performing a major hardware upgrade and more like learning the habits of a stubborn but lovable old machine. Once the storage is configured correctly, the console becomes much easier to live with. Downloads stop feeling like a negotiation. Game updates do not inspire instant panic. And you no longer have to stare at storage warnings as if the system is personally judging your eShop choices.
One of the most common real-world lessons is that the setup matters more than the raw specs on the box. People often assume the newest, fastest, flashiest storage device will be best. On a Wii U, that is not always true. A modest external HDD with stable power often feels more dependable than a sleek portable drive that keeps flirting with disconnects because it is underpowered. The console rewards boring reliability over flashy hardware, which honestly feels very on-brand for a machine that also gave us one of Nintendo’s most underappreciated libraries.
Another thing users notice quickly is how much nicer the digital experience becomes after the drive is installed. Before external storage, downloading a large game can feel like trying to fit a couch through a bathroom door. After setup, the process becomes much more relaxed. You buy a game, install it, and move on with your life. That is not glamorous, but on older hardware, smooth storage management feels weirdly luxurious.
There is also a psychological benefit. Once the external drive is working, the Wii U suddenly feels less limited. You are more willing to keep updates installed, hang on to digital titles you may revisit, and stop deleting things every time you want to try something new. It turns the console from a space-starved system into something that feels organized and usable again.
Of course, the Wii U still has its quirks. The proprietary formatting means you cannot casually repurpose the drive without wiping it. The one-drive-at-a-time rule feels old-fashioned. And if you use a Y-cable, the back of your entertainment center may start to resemble a science fair project. But these are manageable quirks, not deal-breakers. Once you accept the rules, the system is surprisingly stable.
For many long-time owners, the best experience comes from treating the external drive as a permanent companion. Plug it in, leave it in place, give it enough power, and let the Wii U do its thing. That setup tends to produce the fewest headaches. Constantly plugging and unplugging drives, switching storage around, or trying to outsmart the system usually leads to the kind of troubleshooting session that begins with confidence and ends with muttering.
If you are reviving a Wii U in 2026, this upgrade still makes a lot of sense. Whether you are replaying first-party classics, reinstalling old eShop purchases, or just giving the console the storage life it always deserved, a properly set up external hard drive makes the entire experience feel more complete. No, it does not magically turn the Wii U into modern hardware. But it does remove one of the console’s most annoying bottlenecks, and that alone feels like a win.
Final Thoughts
If you want the simplest formula for success, here it is: pick a reliable external hard drive, make sure it has stable power, connect it with the Wii U turned off, format it through the console, and manage your data through Data Management. That is the whole game plan.
Among the many ways to improve a Wii U, setting up external storage is one of the most useful. It gives the console room to breathe, makes digital ownership less annoying, and saves you from constantly playing storage Tetris. And once everything is running smoothly, the Wii U becomes what it always should have been: a charming, quirky Nintendo system with enough space to hold the games you actually want to keep.