Table of Contents >> Show >> Hide
- Why add arrows to screenshots on a Mac?
- How to Add Arrows to a Screenshot on Mac: 8 Steps
- Step 1: Take the screenshot you want to edit
- Step 2: Open the screenshot in Markup or Preview
- Step 3: Turn on the Markup toolbar
- Step 4: Insert an arrow shape
- Step 5: Move and position the arrow exactly where you need it
- Step 6: Change the arrow’s color, thickness, and style
- Step 7: Add text or extra markup if needed
- Step 8: Save, export, and share the finished screenshot
- Best built-in ways to add arrows to screenshots on a Mac
- Troubleshooting: Why can’t I add an arrow to my screenshot?
- Do you need a third-party app?
- Final thoughts
- Real-World Experiences With Adding Arrows to Mac Screenshots
- SEO Tags
Sometimes a screenshot says a thousand words. Other times it says, “Good luck figuring out what I meant.” That is where arrows come in. A clean arrow can point to the exact button, typo, bug, menu, or mystery icon you want someone to notice without forcing them to play detective on your desktop. The good news? If you use a Mac, you do not need a fancy design degree or a third-party editing app just to slap an arrow onto a screenshot.
macOS already gives you built-in tools to capture, mark up, and save screenshots. Whether you grab the image with keyboard shortcuts, open it in Preview, or use Quick Look from Finder, adding arrows is surprisingly simple once you know where Apple hid the controls. And yes, Apple did hide them just enough to make first-time users squint suspiciously at the screen.
In this guide, you will learn exactly how to add arrows to a screenshot on a Mac in 8 easy steps, plus get extra tips for changing arrow color, thickness, placement, and size. I will also cover what to do if the Markup toolbar refuses to appear, how to save a cleaner final image, and when it makes sense to use a third-party screenshot tool instead.
Why add arrows to screenshots on a Mac?
Arrows are one of the fastest ways to make a screenshot more useful. They help when you are:
- Showing someone where to click
- Pointing out a bug or error message
- Giving design feedback
- Creating tutorials or support guides
- Explaining homework steps, project edits, or shopping details
- Saving visual notes for yourself so you remember what mattered later
Compared with writing a long paragraph like “look near the top-right area under the little icon that sort of looks like two sliders,” an arrow gets the job done in about half a second. It is the espresso shot of visual communication.
How to Add Arrows to a Screenshot on Mac: 8 Steps
Step 1: Take the screenshot you want to edit
Start by capturing your screen. On a Mac, the most common screenshot shortcuts are:
- Shift + Command + 3 for the full screen
- Shift + Command + 4 for a selected area
- Shift + Command + 5 to open the Screenshot toolbar
If you only need one specific section, Shift + Command + 4 is usually the cleanest option because it saves you from cropping later. Drag across the exact area you want to capture and release. If your screenshot thumbnail appears in the corner of the screen, that is your fast lane to editing. If not, the file will usually save to your desktop or whatever location you have chosen in screenshot settings.
Pro move: before you take the screenshot, clean up the screen. Close random tabs, hide personal notifications, and remove anything that would make your screenshot look like your desktop lost a fight.
Step 2: Open the screenshot in Markup or Preview
Once the screenshot is taken, you have a few built-in ways to open it for editing:
- Click the floating thumbnail if it appears in the lower corner of the screen
- Double-click the saved screenshot and open it in Preview
- Select the file in Finder and press Space bar to open Quick Look, then choose Markup
If you want the simplest, most reliable method, open the screenshot in Preview. Preview is the default image and PDF viewer on Mac, but it is also a surprisingly capable annotation tool. It lets you add arrows, shapes, text, highlights, signatures, and other visual notes without downloading anything else.
If the image opens but you do not see editing controls yet, do not panic. Apple just likes to make you click one more thing.
Step 3: Turn on the Markup toolbar
In Preview, click the Show Markup Toolbar button. It usually looks like a little pen tip or annotation icon near the top of the window. You can also open it from the menu if needed.
Once the Markup toolbar appears, you will see a collection of tools for shapes, lines, text boxes, sketching, color, border styles, and more. This is where the arrow magic lives. If you plan to annotate screenshots often, get comfortable with this toolbar because it is the control center for almost everything useful.
If you are using Quick Look instead of Preview, the process is similar. Open the file preview, click the Markup button, and you will get access to many of the same editing controls. That makes Quick Look great for fast edits when you do not want to fully open an app.
Step 4: Insert an arrow shape
Now for the star of the show. In the Markup toolbar, click the Shapes button. A menu will appear with options like rectangles, circles, speech bubbles, lines, and arrows. Choose the arrow.
Once selected, the arrow will appear on the screenshot. Usually it lands somewhere in the middle first, which is normal. At this stage it might look too short, too thin, too dramatic, or weirdly judgmental. Ignore that for the moment. You are about to fix it.
Some Mac users also access the arrow through Tools > Annotate > Arrow. If the toolbar path feels confusing, this menu option is a good backup.
Step 5: Move and position the arrow exactly where you need it
Click the arrow and drag it to the part of the screenshot you want to highlight. Then adjust the ends and handles to change its direction, length, and angle.
Most arrows in Preview can be customized by dragging the colored handles:
- Blue handles usually resize or lengthen the arrow
- Green handles can change bend, direction, or angle depending on the shape style
Take a second here and zoom in if needed. Sloppy arrows defeat the whole point. The tip should point clearly to the exact element you want people to notice, not vaguely hover near it like it is trying to remember where it parked.
If several things are close together, use one arrow per important point rather than making a single giant arrow stretch across the screenshot like a dramatic weather map.
Step 6: Change the arrow’s color, thickness, and style
Once the arrow is in the right place, make it easier to see. With the arrow selected, use the style controls in the Markup toolbar to adjust:
- Border color for the arrow color
- Line thickness to make it bolder or thinner
- Shape style to alter the line appearance
- Fill options where applicable
Red is a popular choice because it stands out against most interfaces. Blue also works well. Yellow can be useful on darker screenshots. The real rule is simple: choose a color that does not disappear into the background. A pale gray arrow on a light gray app window is not a helpful annotation; it is camouflage.
If you are creating a tutorial, keep your visual style consistent. Use the same arrow color and line thickness across every screenshot so the guide looks intentional instead of assembled during a caffeine emergency.
Step 7: Add text or extra markup if needed
An arrow alone is often enough, but sometimes it works even better with a short label. For example:
- “Click here”
- “Wrong total”
- “Missing button”
- “Use this menu”
To do that, use the Text tool in the Markup toolbar and place a small text box near the arrow. Keep the wording short and clear. The screenshot should still be quick to understand at a glance. If the image starts looking like a novel with arrows, bubbles, boxes, and commentary in four colors, pull back a little. You are annotating, not directing a superhero movie.
You can also add rectangles, circles, or highlights when you want to combine an arrow with a boxed area. This is especially helpful in crowded screenshots, such as dashboards, spreadsheets, settings menus, or software interfaces with a million tiny controls.
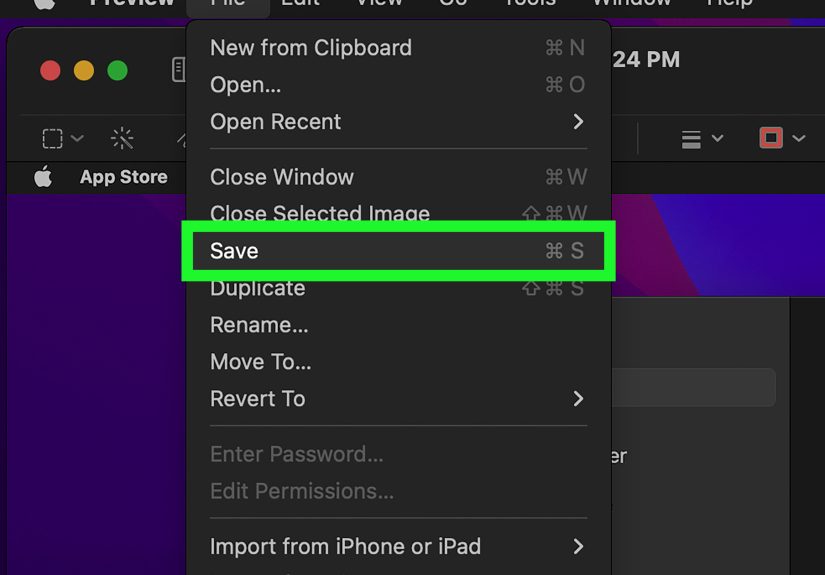
Step 8: Save, export, and share the finished screenshot
When everything looks right, save the edited image. In Preview, choose File > Save or File > Export if you want more control over the file format. PNG is often the best choice for screenshots because it keeps text and interface details sharp. JPEG can work too, but it may slightly soften fine details.
Before you send the image, do one last scan for accidental clutter: browser tabs, email previews, personal usernames, or private information in the background. An arrow may point to one thing, but the screenshot still shows everything else. That is the part people learn approximately one second after sharing something they absolutely did not mean to share.
Then send it off in Messages, Mail, Slack, a class project, a work chat, or wherever your beautifully arrowed screenshot is headed.
Best built-in ways to add arrows to screenshots on a Mac
If you want the short version, here are your three best built-in methods:
1. Floating thumbnail after a screenshot
This is the fastest option when you catch the thumbnail right away. Click it, mark up the screenshot, add your arrow, then save. Great for quick edits.
2. Preview app
This is the most flexible built-in method. It is ideal when you want to carefully position arrows, combine annotations, adjust colors, and export a polished final image.
3. Quick Look with Markup
This is the sneaky efficient option. Select the screenshot in Finder, press the Space bar, click Markup, and edit without fully opening the file in Preview. It is excellent for quick one-off edits.
Troubleshooting: Why can’t I add an arrow to my screenshot?
If the process is not working, one of these issues is usually the reason:
The Markup toolbar is missing
Open the screenshot in Preview and click the Markup button or enable the toolbar from the app menu. In many cases, the tools are available; they are just hidden until you ask nicely.
The arrow will not move or change
Make sure the arrow itself is selected. Click directly on it so the resize handles appear, then drag the handles rather than the image background.
The arrow looks blurry
Export as PNG and avoid excessive resizing. Blurry arrows often come from saving in a compressed format or shrinking and enlarging the screenshot too many times.
You want to edit the arrow later
This is important: if you save annotations directly on an image file, later editing may be limited. If you expect lots of revisions, save a copy first or consider converting the file to PDF before heavy markup.
Do you need a third-party app?
Usually, no. For most people, Preview and Markup are more than enough. But if you create tutorials, software documentation, bug reports, marketing graphics, or support screenshots every day, a dedicated screenshot app can save time.
Power users often like apps such as Snagit, Shottr, CleanShot X, or other annotation-focused tools because they can make arrows, callouts, blurs, numbered steps, and polished exports even faster. Still, for the average Mac user who just wants to point at a button and say “this one,” the built-in tools are perfectly capable.
Final thoughts
Adding arrows to a screenshot on a Mac is one of those tiny skills that pays off way more than expected. Once you know where the Markup tools live, you can explain ideas faster, give better feedback, make cleaner tutorials, and save yourself from typing paragraphs that could have been replaced by one very confident arrow.
The easiest formula is simple: take the screenshot, open it in Preview or Markup, insert an arrow, adjust the style, and save. That is it. No design software, no complicated workflow, no ritual sacrifice to the Settings menu.
So the next time someone asks, “Where exactly do I click?” you can skip the vague directions and send a screenshot that makes the answer obvious.
Real-World Experiences With Adding Arrows to Mac Screenshots
One of the funniest things about Mac screenshots is how quickly they turn normal people into accidental technical support agents. The moment you learn how to add arrows, your screenshots become dramatically more useful. Suddenly you are not just sending a picture of a screen; you are sending directions, context, and a tiny visual explanation that saves everyone time.
For students, arrows on screenshots are great for showing exactly where a formatting issue appears in a document, where an online assignment portal is hiding the upload button, or what part of a research page needs attention. Instead of writing, “the button is somewhere on the right side near the section below the title,” you can point directly to it. That turns a confusing message into an instant answer.
At work, arrows become even more valuable. If you are reviewing a design mockup, reporting a website bug, or sending feedback on a dashboard, an arrow keeps your comment anchored to the exact element you mean. Teams move faster when nobody has to guess what “that icon near the menu thing” refers to. A screenshot with two clear arrows and short labels can replace an entire back-and-forth thread.
They also help in everyday life more than people expect. Maybe you are showing a relative where to click in System Settings. Maybe you are pointing out the right size option before ordering something online. Maybe you are helping a friend find the Wi-Fi menu because, once again, technology has decided to be mysterious for fun. In all those cases, arrows make your instructions more human and less frustrating.
There is also a quality difference between rushed arrows and thoughtful ones. A good arrow is visible, clean, and clearly aimed. A bad arrow points to three things at once and leaves the viewer more confused than before. Over time, people who annotate screenshots a lot start developing habits: zooming in before placing the arrow, sticking to one or two colors, adding short text labels, and keeping the screenshot uncluttered. Those small habits make the image feel polished and easy to understand.
Another common experience is discovering that Preview is far more powerful than expected. A lot of Mac users think of it as “the app that opens when I double-click a file,” and then one day realize it can handle arrows, text, shapes, signatures, highlights, resizing, and quick exports. That discovery tends to produce the same reaction every time: “Wait, Preview can do that?” Yes. It can. Quietly and without bragging.
Of course, there are moments when the built-in tools feel a little clunky. Maybe the arrow handle is not cooperating. Maybe the floating thumbnail disappears before you click it. Maybe you accidentally annotated the wrong copy of the screenshot. That is normal. Most people get smoother after a few tries. Once the workflow clicks, the process becomes muscle memory: capture, open, arrow, save, send.
In the end, the real experience of adding arrows to screenshots on a Mac is not about the arrow itself. It is about clarity. It is about making communication easier for classmates, coworkers, friends, customers, or even your future self. And honestly, anything that helps humans explain computer problems with fewer words deserves a little appreciation.