Table of Contents >> Show >> Hide
- Why Delta Faucets Leak in the First Place
- Tools and Parts You May Need
- Step 1: Identify Where the Faucet Is Leaking
- Step 2: Shut Off the Water Supply
- Step 3: Remove the Faucet Handle
- Step 4: Repair a Delta Ball-Style Faucet
- Step 5: Repair a Delta Cartridge Faucet
- Step 6: Repair a Delta Two-Handle Faucet
- Step 7: Fix a Leak Around the Faucet Base
- Step 8: Clean the Aerator and Flush the Faucet
- Common Mistakes to Avoid
- Troubleshooting After the Repair
- When to Call a Plumber
- How to Prevent Future Delta Faucet Leaks
- Real-World Experience: Lessons From Repairing a Leaky Delta Faucet
- Conclusion
A leaky Delta faucet has a special talent for becoming the loudest thing in the house at 2:13 a.m. Drip. Drip. Drip. It is not a plumbing emergency in most cases, but it is annoying, wasteful, and surprisingly good at making you question your life choices. The good news? Many Delta faucet leaks are caused by small, inexpensive parts such as seats, springs, cartridges, O-rings, or worn seals. With a few tools, a little patience, and a towel you do not emotionally depend on, you can often repair the leak yourself.
This guide explains how to repair a leaky Delta faucet in clear, practical steps. It covers single-handle kitchen faucets, two-handle bathroom faucets, ball-style Delta faucets, cartridge faucets, leaks from the spout, leaks around the base, and those sneaky little drips that appear after you thought everything was fixed. Whether your faucet is doing a slow dramatic tear or a full-time drip concert, let’s get it quiet again.
Why Delta Faucets Leak in the First Place
Delta faucets are known for being repair-friendly, which is great news for homeowners. Many models are built so that worn internal parts can be replaced without removing the entire faucet from the sink. The most common causes of a leaky Delta faucet include worn rubber seats, tired springs, a damaged cartridge, a loose or cracked O-ring, mineral buildup, corrosion around the valve seat, or a handle assembly that is not seated correctly.
If water drips from the spout when the faucet is turned off, the problem is usually inside the valve body. In many Delta ball-style and two-handle faucets, the seats and springs are the usual suspects. If water leaks around the base of the spout, the O-rings may be worn. If the handle feels stiff, loose, or hard to control, the cartridge or stem assembly may need attention. Think of the faucet as a tiny water traffic cop. When one little rubber part gets lazy, the whole intersection backs up.
Tools and Parts You May Need
Before you begin, gather your tools. Nothing ruins a DIY plumbing moment faster than standing at the sink with the faucet half-apart while whispering, “Where is the Allen wrench?”
- Allen wrench or hex key
- Phillips screwdriver
- Flathead screwdriver
- Adjustable wrench or channel-lock pliers
- Needle-nose pliers
- Clean towel or rag
- Sink stopper or drain cover
- White vinegar for mineral buildup
- Plumber’s silicone grease
- Delta replacement cartridge, seats and springs, O-rings, or repair kit
For many Delta faucets, a common repair part is the Delta RP4993 seats and springs kit. However, not every Delta faucet uses the same parts. The safest move is to identify your faucet model before buying parts. If you cannot find the model number, remove the old cartridge, stem, or seat-and-spring set and take it to a hardware store for comparison. Your old part may look unimpressive, but in the plumbing aisle it becomes a celebrity witness.
Step 1: Identify Where the Faucet Is Leaking
Start by watching the faucet closely. A leak from the spout means water is slipping past the internal shutoff components. In Delta ball-style faucets, this often points to worn seats and springs. In cartridge faucets, the cartridge may be worn or damaged. A leak around the handle can suggest a worn O-ring, stem, or packing component. Water pooling around the base of a kitchen faucet often means the spout O-rings need replacing.
Also check below the sink. Sometimes what looks like a faucet leak is actually a loose supply line, a failing shutoff valve, or water dripping from the sprayer hose. Wipe everything dry with a towel, turn the faucet on and off, and look carefully for the first place water appears. Plumbing diagnosis is basically detective work, except the culprit is wet and lives under your sink.
Step 2: Shut Off the Water Supply
Before removing any handle, turn off the hot and cold shutoff valves under the sink. Turn them clockwise until they stop. If the valves are stuck, do not force them with heroic enthusiasm. You may need to shut off the home’s main water supply instead. After shutting off the water, open the faucet to release pressure and drain remaining water from the line.
Cover the drain with a stopper, towel, or small rag. Delta faucet screws, springs, and clips are small enough to vanish into a drain like they have been training for it. Protect the sink surface with another towel so tools do not scratch the finish.
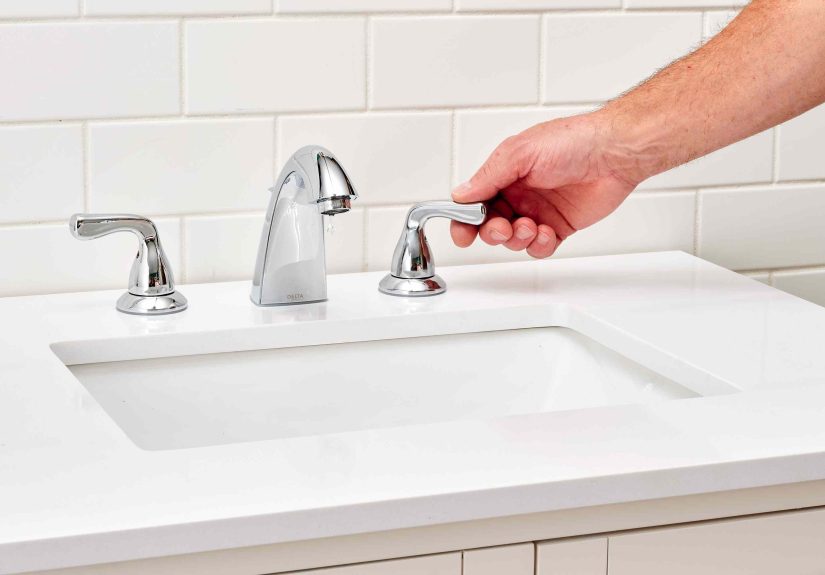
Step 3: Remove the Faucet Handle
Most Delta faucet handles are held in place by a set screw, often located behind or under the handle. Use the correct Allen wrench to loosen the set screw, then lift off the handle. Some two-handle faucets have decorative caps covering a Phillips screw. Pry off the cap gently with a flathead screwdriver, remove the screw, and pull the handle straight up.
If the handle refuses to move, mineral buildup may be holding it hostage. Wrap the area with a vinegar-soaked cloth for a while, then try again. Avoid hammering, yanking, or delivering a speech about betrayal. Faucet finishes scratch easily, and replacement trim can cost more than the tiny part you are actually trying to reach.
Step 4: Repair a Delta Ball-Style Faucet
Many older Delta single-handle faucets use a ball assembly. If water drips from the spout, the seats and springs are usually the first parts to replace. After removing the handle, unscrew the cap or bonnet nut. Lift out the cam, packing, and ball assembly. Pay attention to how the ball is positioned because it must go back in the same way.
Inside the faucet body, you will see small rubber seats with springs underneath. Use a small screwdriver or needle-nose pliers to remove them. Insert the new spring first, then place the new rubber seat over it. In many Delta-style repairs, the wider end of the spring goes down into the valve body and the rubber seat sits on top. A small Allen wrench can help guide the seat and spring into position.
Reinstall the ball assembly, aligning the slot or pin correctly. Replace the cam and packing, then reinstall the cap. Tighten it snugly, but do not overdo it. Over-tightening can make the handle stiff and may damage parts. The goal is “secure,” not “sealed by a medieval blacksmith.”
Step 5: Repair a Delta Cartridge Faucet
Many newer Delta kitchen and bathroom faucets use cartridges. A cartridge controls water flow and temperature. When it wears out, water can drip from the spout even when the handle is off. After removing the handle and trim, look for a retaining nut, bonnet nut, or clip holding the cartridge in place.
Remove the retaining piece carefully. Before pulling the cartridge, take a photo so you remember its orientation. Some cartridges have tabs that must align with notches inside the faucet body. Pull the cartridge straight up. If it is stuck, gently wiggle it while pulling. Avoid twisting aggressively unless your specific model allows it.
Install the new cartridge in the same orientation as the old one. Apply a small amount of plumber’s silicone grease to rubber O-rings if recommended for your part. Push the cartridge fully into place, reinstall the retaining nut or clip, and reassemble the handle. If the hot and cold water are reversed after repair, the cartridge orientation may be wrong. Congratulations: your faucet is not haunted, just rotated incorrectly.
Step 6: Repair a Delta Two-Handle Faucet
For a Delta two-handle faucet dripping from the spout, first determine whether the hot or cold side is leaking. Turn off one supply valve at a time and watch the drip. If turning off the hot valve stops the drip, repair the hot side. If turning off the cold valve stops it, repair the cold side. If you are unsure, repair both sides while the faucet is open. Seats and springs are inexpensive, and your future self will appreciate the efficiency.
Remove the handle, loosen the bonnet nut, and pull the stem or cartridge straight out. Under the stem you may find a rubber seat and spring. Remove both and install new ones. Reinstall the stem in the same orientation. Some stems have a stop that controls handle rotation, so make sure it faces the correct direction. Reassemble the handle and repeat on the other side if needed.
Step 7: Fix a Leak Around the Faucet Base
If water leaks around the base of a Delta kitchen faucet spout, the spout O-rings may be worn. After turning off the water and removing the handle and cap, pull the spout body upward. You should see one or more O-rings around the faucet body. Remove the old O-rings carefully with a small screwdriver or pick, taking care not to scratch the metal.
Coat the new O-rings lightly with plumber’s silicone grease and roll them into place. Do not use petroleum-based grease because it can damage rubber parts. Reinstall the spout and move it side to side to make sure it turns smoothly. A properly greased O-ring should feel smooth, not crunchy, squeaky, or emotionally exhausted.
Step 8: Clean the Aerator and Flush the Faucet
After replacing internal parts, remove and clean the aerator at the tip of the spout. Mineral deposits and tiny debris from the repair can collect in the screen. If the aerator is stuck, wrap it with a vinegar-soaked cloth to loosen mineral buildup, then remove it gently with pliers and a towel to protect the finish.
Before reinstalling the aerator, turn the water supply back on slowly. Let the faucet run for a minute to flush debris from the new parts. Then reinstall the aerator and test both hot and cold water. Turning the supply valves on slowly protects the new seals from sudden pressure.
Common Mistakes to Avoid
Buying Parts Before Identifying the Faucet
Delta has made many faucet styles over the years. A repair kit that works perfectly for one model may not fit another. Match the model number or bring old parts to the store.
Forgetting the Part Order
Lay parts on a towel in the order you remove them. Better yet, take photos at each stage. Your phone is not just for food pictures and weather panic; it is a plumbing assistant.
Over-Tightening the Bonnet Nut
A bonnet nut should be snug, not crushed into submission. Over-tightening can damage threads, crack parts, or make the handle difficult to move.
Skipping the O-Rings
If the faucet is already apart, inspect the O-rings. Replacing a cartridge but ignoring flattened O-rings can lead to another leak a week later, which is how faucets earn villain status.
Using the Wrong Grease
Use plumber’s silicone grease on rubber faucet parts. Avoid petroleum-based products unless the manufacturer specifically says they are safe for that part.
Troubleshooting After the Repair
If the faucet still drips after replacing the seats and springs, check whether the seat was installed correctly over the spring. Make sure no old rubber fragments remain inside the valve body. Inspect the ball, stem, or cartridge for scratches, cracks, or mineral deposits. A worn ball assembly or damaged cartridge may need replacement along with the seats and springs.
If the handle leaks, inspect the O-rings, packing, or bonnet area. If water leaks under the sink, check the supply lines and connections. If the faucet has low flow after repair, clean the aerator and flush the faucet again. Debris often breaks loose during a repair and heads straight for the aerator screen like it has reservations there.
When to Call a Plumber
Many Delta faucet repairs are beginner-friendly, but not every situation deserves a DIY battle. Call a licensed plumber if the shutoff valves are frozen, the faucet body is corroded, the cartridge is stuck beyond reasonable effort, water is leaking inside the cabinet or wall, or the faucet continues leaking after correct parts are installed. Also call a pro if you are working on a shower valve and are uncomfortable opening the wall trim or dealing with older plumbing.
A plumber is also a smart choice when the repair requires special tools, when replacement parts are discontinued, or when the faucet itself is damaged. Repairing a small part is wonderful. Flooding a cabinet to prove a point is less wonderful.
How to Prevent Future Delta Faucet Leaks
To keep your Delta faucet working longer, avoid forcing the handle closed. If the faucet drips, cranking the handle harder usually damages parts faster. Clean the aerator occasionally, especially in areas with hard water. Wipe around the base of the faucet to catch early signs of seepage. If your faucet starts feeling stiff, squeaky, or loose, inspect it before a small issue becomes a steady leak.
It is also wise to keep a small faucet repair kit on hand if your home has several Delta fixtures. Seats, springs, and O-rings are small, affordable, and easy to store. They are the plumbing equivalent of keeping batteries in the junk drawer: not glamorous, but heroic at the right moment.
Real-World Experience: Lessons From Repairing a Leaky Delta Faucet
The first thing experience teaches about repairing a leaky Delta faucet is that the leak is rarely as dramatic as your imagination makes it. Most people hear the drip, picture a giant plumbing invoice, and assume the whole faucet has failed. In reality, the problem is often a tiny rubber seat or spring that costs less than lunch. The second lesson is that preparation matters more than strength. A faucet repair does not reward the person who twists hardest. It rewards the person who shuts off the water, covers the drain, lines up the parts, and takes a photo before removing the cartridge.
One common experience is discovering that the handle screw is harder to find than the leak itself. Delta handles often hide set screws under the handle or behind a small decorative plug. Once you find it, use the right size Allen wrench. A stripped set screw can turn a 30-minute repair into a tiny metal soap opera. If the screw is crusty from mineral buildup, a little patience and vinegar can save the day.
Another practical lesson is to repair both sides of a two-handle faucet if the parts are old. Maybe only the hot side is dripping today, but the cold side has been living the same life, drinking the same hard water, and aging at the same speed. Replacing both sets of seats and springs while the faucet is already apart often prevents a repeat performance next month.
People also learn quickly that “almost seated” is not seated. A cartridge or rubber seat that is slightly crooked can still leak. When installing new seats and springs, guide them carefully into their holes and make sure they sit flat. When installing a cartridge, align tabs and notches exactly. If something does not sit properly, do not force the handle back together and hope for the best. Hope is not a sealant.
One of the best tricks is to place removed parts on a white towel in order. This makes tiny springs easier to see and helps you remember the reassembly sequence. Another useful habit is to turn the water back on slowly after the repair. A sudden blast of pressure can shift small parts or send debris into the aerator. After flushing the faucet, remove and rinse the aerator if the flow seems weak.
The most satisfying part of the repair is the silence afterward. No drip. No midnight water metronome. No guilt about wasted water. A repaired Delta faucet feels like a small household victory, the kind that makes you walk past the sink twice just to admire the absence of drama. And that is the quiet beauty of faucet repair: with a few simple parts and a calm approach, you can turn an irritating leak into a fixed fixture and a very respectable DIY brag.
Conclusion
Learning how to repair a leaky Delta faucet is one of the most useful DIY plumbing skills a homeowner can have. Most leaks come from worn seats, springs, cartridges, O-rings, or seals, and many repairs can be completed with basic tools. Start by identifying where the leak is coming from, shut off the water, remove the handle carefully, replace the worn parts, flush the faucet, and test your work. Work slowly, keep parts organized, and avoid over-tightening. If the leak continues or the plumbing looks damaged, call a licensed plumber before a small drip becomes a cabinet-swelling adventure.