Table of Contents >> Show >> Hide
- Why Shower Curtain Wall Art Works So Well
- Best Shower Curtains to Use for Wall Art
- Supplies You’ll Need
- Step-by-Step: How to Turn a Shower Curtain Into Wall Art
- Step 1: Decide on the Final Size
- Step 2: Plan the Crop
- Step 3: Build the Wood Frame
- Step 4: Sand and Finish the Frame
- Step 5: Iron or Steam the Shower Curtain
- Step 6: Lay the Curtain Face Down
- Step 7: Staple the First Side
- Step 8: Staple the Opposite Side
- Step 9: Staple the Remaining Sides
- Step 10: Fold the Corners Neatly
- Step 11: Add Hanging Hardware
- Design Ideas for Shower Curtain Wall Art
- Common Mistakes to Avoid
- How Much Does This Project Cost?
- Cleaning and Care Tips
- Renter-Friendly Tips
- Experience Notes: What It’s Really Like to Make Shower Curtain Wall Art
- Conclusion
Some home decor ideas sound questionable until they become genius. Turning a shower curtain into wall art is one of them. At first, it may sound like the kind of craft project that begins with “trust me” and ends with glitter in your carpet. But in reality, a beautiful shower curtain can become large-scale DIY wall art that looks expensive, custom, and surprisingly polished.
If you have ever priced oversized canvas art, you already know the drama. A big statement piece can cost hundreds of dollars, and sometimes it still looks like something you have seen in every dentist’s waiting room since 2009. A shower curtain, on the other hand, offers a huge printed design for a fraction of the price. With a simple wood frame, a staple gun, and a little patience, you can transform it into a bold piece of wall decor for your living room, bedroom, hallway, office, nursery, or rental apartment.
This guide walks you through how to turn a shower curtain into wall art step by step, including supplies, measuring tips, framing methods, hanging advice, design ideas, common mistakes, and real-life experience notes from doing this project the practical waynot the “perfectly styled craft video with suspiciously clean hands” way.
Why Shower Curtain Wall Art Works So Well
A shower curtain is basically oversized fabric with personality. Many are printed with florals, abstract designs, landscapes, line drawings, vintage-inspired patterns, geometric shapes, coastal scenes, or moody botanical prints. Because most standard shower curtains are around 72 by 72 inches, they offer enough material to create a large canvas-style artwork without needing a professional printer.
The best part is scale. Large art makes a room feel finished. It can anchor a sofa, balance a bed, fill an awkward wall, or add color where your decor feels a little too “I just moved in and own one lamp.” When stretched over a frame, the curtain loses its bathroom identity and becomes a dramatic textile art piece.
This DIY shower curtain wall art project is also beginner-friendly. You do not need advanced woodworking skills. If you can measure, cut or ask a hardware store to cut wood, pull fabric snugly, and use a staple gun, you can make this work. The project is budget-friendly, customizable, and ideal for people who want high-impact decor without high-impact spending.
Best Shower Curtains to Use for Wall Art
Not every shower curtain is destined for gallery greatness. Some are too thin, too plastic-looking, or too obviously “bathroom.” Choose your curtain carefully, because the print is the star of the project.
Choose Fabric Over Plastic When Possible
Fabric shower curtains usually look more like real artwork once stretched. Cotton, polyester, linen blends, and canvas-like materials tend to photograph better, hang better, and stretch more smoothly than stiff vinyl. Plastic curtains can work, especially if the design is amazing, but they may reflect light and wrinkle in a way that gives away their humble origin story.
Look for Large, Balanced Prints
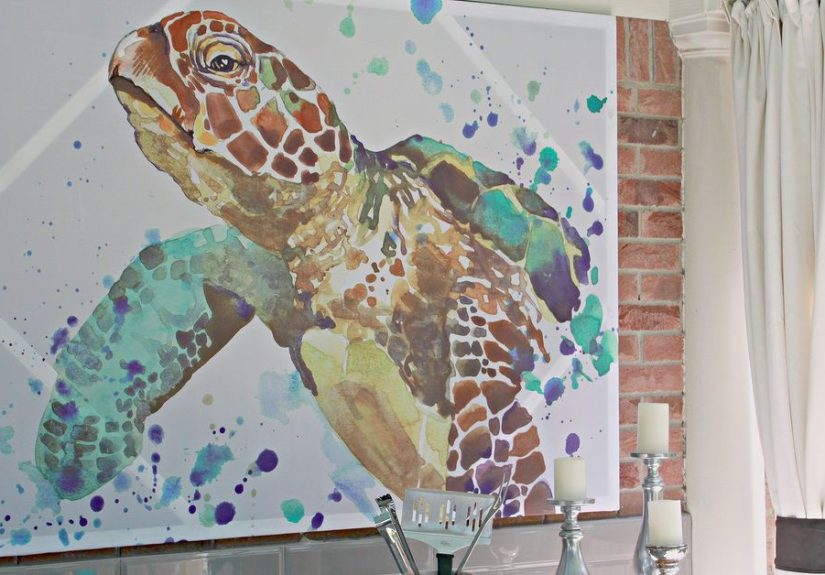
A large-scale floral, abstract landscape, black-and-white sketch, or scenic mural works beautifully. Tiny repeated patterns can still be cute, but they may look more like stretched fabric than statement art. Before buying, imagine the curtain cropped inside a frame. Ask yourself: “Would I believe this was sold as canvas wall art?” If the answer is yes, add it to your cart before your practical side starts asking questions.
Check the Colors in Your Room
The easiest way to make DIY wall art look intentional is to repeat colors already in your space. If your room has warm wood tones, cream textiles, and olive pillows, a botanical curtain with greens and neutrals will feel cohesive. If your space is modern and minimal, try black-and-white line art, muted abstract shapes, or soft desert tones.
Supplies You’ll Need
Here is a practical supply list for making shower curtain canvas art. You can adjust the materials depending on the size of your curtain and how sturdy you want the finished piece to be.
- One fabric shower curtain with a design you love
- 1×2 wood boards, pine furring strips, or canvas stretcher bars
- Measuring tape
- Pencil
- Miter saw, hand saw, or pre-cut boards
- Wood screws or corner braces
- Drill or screwdriver
- Staple gun and staples
- Iron or steamer
- Scissors or fabric shears
- Hanging hardware, such as D-rings, sawtooth hangers, or picture wire
- Wall anchors or screws, depending on your wall type
- Optional: white fabric backing, wood glue, sandpaper, stain, paint, or trim
If your shower curtain is thin or slightly see-through, add a plain white sheet or lightweight canvas behind it before stapling. This keeps the wood frame from showing through and makes the colors appear cleaner. It is a small step that can make the final artwork look less homemade and more “designer found this at a boutique and refuses to reveal the source.”
Step-by-Step: How to Turn a Shower Curtain Into Wall Art
Step 1: Decide on the Final Size
Start by measuring your wall and the shower curtain. A standard 72-inch curtain can become a large square artwork, but you do not have to use the full size. You might make a 60-by-48-inch piece for above a sofa, a 48-by-48-inch square for a bedroom, or two smaller panels for a hallway.
Leave extra fabric around all sides so you can wrap it around the back of the frame. A good rule is to make the frame at least 3 to 6 inches smaller than the curtain on each side. This gives you enough material to pull, fold, and staple securely.
Step 2: Plan the Crop
Lay the shower curtain flat on the floor with the printed side facing up. Place painter’s tape or lightweight objects around the section you want to feature. This is especially important for curtains with a main focal point, such as a face, flower, mountain, ocean scene, or abstract shape.
Do not rush this part. Once the curtain is stapled, adjusting the design becomes annoying. Center the most interesting part of the print, but do not be afraid of an off-center composition if it looks artistic. Sometimes asymmetry gives wall art a more modern, expensive feel.
Step 3: Build the Wood Frame
Cut your wood boards to size. For a basic rectangular frame, you need two vertical pieces and two horizontal pieces. Add a center support board if the frame is wide or tall. Large DIY canvas wall art can warp over time if the frame is too flimsy, so do not skip the support if your piece is bigger than about 48 inches in either direction.
Use screws, wood glue, or corner braces to attach the boards. Check that the corners are square before tightening everything fully. A slightly crooked frame may not be obvious on the floor, but once it is hanging on your wall, it will stare at you like a tiny home improvement betrayal.
Step 4: Sand and Finish the Frame
Sand rough edges so they do not snag the fabric. If the sides of your frame will show, paint or stain them before attaching the curtain. Natural wood can look warm and casual, black paint creates a modern gallery effect, and white paint blends well with light walls.
If you want a floating-frame look, you can add trim or thin lattice strips around the outside after the curtain is stapled. This makes the finished artwork look more custom and helps hide uneven fabric edges.
Step 5: Iron or Steam the Shower Curtain
Wrinkles are the enemy of polished DIY wall art. Before stapling, iron or steam the shower curtain according to the care label. Use low heat for synthetic fabrics and avoid melting anything. If the curtain has deep fold lines from packaging, hang it for a day or lightly mist it before steaming.
This step is not glamorous, but it matters. Stretching a wrinkled curtain over a frame does not magically remove all creases. It simply creates a framed wrinkle, which is less “modern art” and more “laundry escaped.”
Step 6: Lay the Curtain Face Down
Spread the shower curtain face down on a clean floor or large table. Make sure the print is oriented correctly. Then place the wood frame on top of it, back side facing up. Double-check that your chosen design is centered and that there is enough extra fabric on all sides.
If you are using a white backing fabric, lay it down first, then place the shower curtain on top, printed side down. The backing and curtain will be stapled together.
Step 7: Staple the First Side
Start in the center of one side. Pull the fabric snug, not wildly tight, and place your first staple into the back of the frame. Move a few inches to the left and right of that staple, pulling smooth as you go. Do not staple the entire side from one end to the other yet.
The goal is even tension. Think of it like wrapping a gift, except the gift is huge and may require a snack break.
Step 8: Staple the Opposite Side
Move to the opposite side of the frame. Pull the curtain firmly so the front becomes smooth, then staple in the center. Continue outward in small sections, alternating tension as needed. Check the front often to make sure the image is not shifting or twisting.
For the cleanest result, work from the center toward the corners on each side. This helps prevent bubbles, diagonal wrinkles, and loose areas.
Step 9: Staple the Remaining Sides
Repeat the same process on the two remaining sides. Pull, smooth, staple, and check. Keep the fabric tight enough to look flat but not so tight that the design stretches or the frame bows inward.
If your curtain has straight lines, stripes, borders, or architectural patterns, pay extra attention. Crooked lines are very easy to spot. For organic patterns like flowers or watercolor shapes, you have more forgiveness.
Step 10: Fold the Corners Neatly
Corners are where many DIY projects either become beautiful or start muttering threats. Fold them like hospital corners on a bed: smooth one side down, tuck the extra fabric, and staple securely on the back. Trim bulky fabric if needed, but do not cut too close to the staples.
The front corners should look smooth and tight. If they look lumpy, remove a staple and refold. A flat corner makes the whole piece feel more professional.
Step 11: Add Hanging Hardware
Attach D-rings, sawtooth hangers, or picture wire to the back of the frame. For large artwork, D-rings and picture wire usually feel more secure than a single tiny hanger. Measure carefully so the artwork hangs level.
If the piece is heavy, try to hang it into wall studs. If studs are not available, use wall anchors rated for the weight of your finished frame. Always check the hardware packaging and choose anchors that match your wall type, whether drywall, plaster, brick, or masonry.
Design Ideas for Shower Curtain Wall Art
Create Oversized Art Above a Sofa
A large shower curtain art piece can replace several smaller frames above a sofa. Choose a design that is about two-thirds the width of the sofa for a balanced look. Abstract prints, botanical scenes, and soft landscapes are great choices because they add color without making the room feel crowded.
Make a Statement Headboard
If your bedroom needs drama, hang the framed shower curtain above the bed like a giant canvas headboard. This works especially well with moody florals, linen-look textures, Japanese-inspired prints, or calming watercolor designs.
Use It in a Dining Room
A bold piece of shower curtain wall art can make a dining room feel finished without needing a full gallery wall. Try a curtain with rich colors, vintage patterns, or oversized fruit and floral designs. Dining rooms can handle a little personality. In fact, they usually need it.
Create a Pair or Triptych
If one large piece feels too heavy, divide the curtain into two or three panels. A triptych works beautifully with abstract or scenic prints. Build three narrow frames, wrap each section separately, and hang them with equal spacing. The result feels custom and architectural.
Frame Seasonal Art
Shower curtains come in holiday, winter, coastal, spring floral, and autumn designs. You can create affordable seasonal wall art and swap it out during the year. Store the framed pieces flat or wrap them in a sheet to protect the fabric.
Common Mistakes to Avoid
Using a Curtain That Is Too Thin
Thin fabric can show the frame underneath, especially in bright rooms. Add a white backing fabric if needed. This trick makes a big difference and keeps the print looking crisp.
Skipping the Center Support
Large frames need support. Without a middle brace, the wood can twist or bow. A simple vertical or horizontal support board keeps the structure stronger and helps the art sit flat against the wall.
Stapling Without Checking the Front
Do not wait until the end to flip the artwork over. Check the front often as you staple. If the pattern shifts, it is much easier to fix after five staples than after fifty.
Pulling Too Hard
Yes, the curtain should be tight. No, it should not be stretched like it is training for the Olympics. Overstretching can distort the print, bend the frame, or create uneven tension.
Choosing Weak Hanging Hardware
Large wall art can be lightweight, but it still needs proper hardware. Use reliable hangers and anchors. Nobody wants their beautiful DIY canvas art making a dramatic midnight dive behind the couch.
How Much Does This Project Cost?
The cost depends on the shower curtain, wood, and hardware you choose. A budget version may cost around the price of a curtain, a few boards, and staples. A more polished version with quality wood, stain, backing fabric, and trim will cost more but still usually comes in far below the price of large store-bought canvas art.
To save money, look for shower curtains on sale, check clearance sections, use leftover wood, or repurpose an old canvas frame. You can also thrift fabric curtains, tapestries, or unused shower curtains if they are clean and in good condition.
Cleaning and Care Tips
Once your shower curtain becomes wall art, treat it like textile decor. Dust it gently with a microfiber cloth or vacuum it using a brush attachment on low suction. Avoid soaking the fabric after it is mounted, because moisture can affect the wood frame and cause sagging.
If the artwork is going in a humid space, choose fabric carefully and avoid placing it where it will be splashed. Iron or steam the curtain before framing, because cleaning wrinkles later is difficult. If the art gets stained, spot-clean gently with a damp cloth and mild soap, testing an inconspicuous back edge first.
Renter-Friendly Tips
If you rent, this project is still possible. Use lighter wood, keep the frame manageable, and choose removable hanging solutions only if they are rated for the weight. For larger pieces, wall anchors or screws may be safer, but always follow your lease rules.
You can also lean the finished artwork on a mantel, dresser, console table, or behind a sofa. Large leaning art looks casual and stylish, and it saves you from turning your wall into a negotiation with your landlord.
Experience Notes: What It’s Really Like to Make Shower Curtain Wall Art
The first thing you learn when turning a shower curtain into wall art is that the floor becomes your workshop, your measuring station, your design studio, and possibly your emotional support surface. Large fabric projects need space. Before starting, move furniture, sweep the floor, and keep pets away unless you want tiny paw-based opinions permanently included in the project.
One of the most useful experiences is testing the design before building the frame. Lay the curtain on the floor, step back, and look at it from across the room. A print that looks fantastic folded in a package may feel too busy when enlarged. On the other hand, a simple design may suddenly look expensive when scaled up. Large wall art changes the mood of a room quickly, so give yourself time to choose the right crop.
Another practical lesson is that wood quality matters. Cheap boards are great for saving money, but they can be warped. Before buying, place each board on the floor or sight down its length to check for bends. A warped board can make the finished wall art pull away from the wall or look uneven. You do not need luxury lumber, but you do need pieces that are straight enough to behave themselves.
Stapling is easier when you work slowly and alternate sides. The temptation is to staple one full side, celebrate your progress, and then discover the front has shifted like a rug under a running dog. Instead, staple the center top, center bottom, center left, and center right, then keep moving outward. This method keeps the tension balanced and helps the design stay centered.
The corners may take a few tries. That is normal. Fabric corners are often bulky, especially if the shower curtain has a thicker hem. If the corner looks lumpy from the front, remove the staple and fold again. A flat, neat corner instantly improves the final result. It is one of those small details that separates “I made this during a caffeine event” from “Yes, I casually create custom wall art.”
Hanging the piece is often the most stressful part, not because it is hard, but because nobody wants to drop their new masterpiece. Measure twice, use a level, and mark the wall lightly with pencil. If the artwork is wide, two hanging points are better than one. It keeps the frame from tilting every time someone walks by with enthusiasm.
The biggest surprise is how convincing the final piece can look. Once the curtain is stretched, framed, and hung, people rarely guess it started in the bathroom aisle. They usually ask where you bought the art. This is your moment. You can either proudly explain the DIY process or smile mysteriously like a person with access to secret designer warehouses.
This project also teaches a helpful decorating lesson: expensive-looking rooms are not always made from expensive things. Scale, color, texture, and placement matter just as much as price. A shower curtain with the right print can bring softness, drama, humor, calm, or energy into a room. The magic is not the object itself. The magic is seeing potential where other people see a bathroom accessory.
Conclusion
Learning how to turn a shower curtain into wall art is one of the smartest DIY decorating tricks for anyone who wants big style on a realistic budget. With a beautiful fabric shower curtain, a simple wood frame, and careful stapling, you can create oversized wall decor that feels personal, polished, and completely custom.
The key is choosing the right print, building a sturdy frame, smoothing the fabric before stapling, working from the center outward, and hanging the finished piece securely. Whether you use it above a sofa, behind a bed, in a dining room, or as seasonal decor, shower curtain wall art proves that creativity does not need a luxury price tag. Sometimes your next favorite artwork is hiding in the bath section, minding its own business.
Note: This article is written as original, publish-ready content based on practical DIY wall art methods, textile framing techniques, and common home-improvement best practices. It contains no copied source text, no unnecessary citation placeholders, and no non-publishable reference tags.