Table of Contents >> Show >> Hide
- What “Upload Pictures from Android” Really Means
- Before You Start: A Quick Reality Check
- The 10 Steps to Upload Pictures from Android
- Step 1: Decide Where You Want to Upload the Pictures
- Step 2: Connect to a Stable Network
- Step 3: Organize the Pictures You Want to Upload
- Step 4: Check App Permissions on Your Android Device
- Step 5: Open the App or Tool You Want to Use
- Step 6: Choose Upload, Backup, or Transfer
- Step 7: Select the Pictures or Folders
- Step 8: Adjust Settings for Quality, Data Use, or Destination Folder
- Step 9: Start the Upload and Wait for Confirmation
- Step 10: Verify That the Photos Are Actually There
- Best Ways to Upload Pictures from Android
- Common Problems When Uploading Pictures from Android
- Experience-Based Tips: What Actually Helps in Real Life
- Conclusion
- SEO Tags
Note: Body-only HTML, ready to paste into a CMS or webpage editor.
If your Android phone is packed with vacation shots, pet portraits, screenshots you swear are important, and at least one accidental photo of the inside of your pocket, welcome. You are among friends. The good news is that learning how to upload pictures from Android is not difficult. The better news is that once you know the process, you can send photos to the cloud, move them to a computer, back them up automatically, and stop living in fear of the dreaded Storage Almost Full warning.
This guide walks through a simple, practical 10-step method that works whether you want to upload pictures from Android to Google Photos, Google Drive, OneDrive, Dropbox, a Windows PC, or another device. Think of it as your no-drama, no-tech-panic roadmap. Tap, upload, done. Or at least mostly done, because technology likes a little suspense.
What “Upload Pictures from Android” Really Means
Before we jump into the steps, let’s clear up one small but important thing: people use the word upload in a few different ways. Sometimes they mean uploading photos from Android to cloud storage, like Google Photos or Dropbox. Sometimes they mean transferring pictures from an Android phone to a laptop or desktop. And sometimes they mean sending images into an app, website, email, or social platform.
This article covers the full idea of uploading pictures from Android, so the steps below are flexible enough to help with all of those situations. You’ll learn how to prepare your phone, choose the right destination, upload safely, and confirm that your photos actually made it where they were supposed to go. Because “I thought it uploaded” is not the kind of sentence anyone enjoys saying out loud.
Before You Start: A Quick Reality Check
Take one minute to check a few basics before uploading your Android photos:
- Make sure your phone is connected to Wi-Fi or a stable mobile data connection.
- Charge your device or keep it plugged in if you’re uploading lots of large images.
- Confirm you’re signed into the correct account in the app you plan to use.
- Give the app permission to access your photos and media.
- Know where you want the pictures to go: cloud storage, a PC, or another app.
That tiny prep step saves a surprising amount of frustration. Most failed Android photo uploads happen because of weak internet, limited permissions, the wrong account, or a cable that only charges and does not transfer data. Sneaky little rascal.
The 10 Steps to Upload Pictures from Android
Step 1: Decide Where You Want to Upload the Pictures
The first step is simple but important: choose the destination. Are you uploading pictures from Android to Google Photos for backup? To Google Drive for file storage? To OneDrive because you live in the Microsoft ecosystem? To Dropbox because your files already live there? Or are you moving photos from your Android phone to a computer?
Each option has a slightly different path, but the basic workflow is the same. Pick the destination first so you are not wandering through apps like a tourist without a map.
Step 2: Connect to a Stable Network
If you are uploading a handful of pictures, almost any decent connection will do. If you are sending hundreds of photos or high-resolution images, Wi-Fi is the safer bet. Uploading over mobile data can work, but it may be slower, and some apps limit or manage backup behavior unless you change settings.
This matters even more for vacations, family events, or work shoots, where you may be uploading dozens of images at once. A flaky connection can cause partial uploads, stalled progress, or duplicate files. Nobody wants their beach sunset backed up five times while the actual important photo never leaves the phone.
Step 3: Organize the Pictures You Want to Upload
Open your Gallery or Photos app and decide what you are uploading. This step sounds obvious, but it helps more than you think. If you want to upload just a few pictures, select them manually. If you want to back up everything, check whether your photos are stored only in the Camera folder or also in downloads, screenshots, messaging folders, or editing apps.
Organizing your photos before uploading makes everything cleaner. You can create albums, remove blurry duplicates, and avoid sending random screenshots of grocery lists into the cloud forever. Some memories deserve backup. Some deserve deletion with confidence.
Step 4: Check App Permissions on Your Android Device
If the upload app cannot see your photos, nothing else matters. On Android, permissions control whether an app can access your pictures, videos, and files. If an upload button looks fine but no images appear when you tap it, permissions are usually the culprit.
Go to your phone’s settings, open the app permissions section, and confirm that the app you are using can access your photos or files. This applies to Google Photos, Drive, Dropbox, OneDrive, social apps, email apps, and pretty much anything else that handles images. Without permission, your upload mission ends before the rocket leaves the pad.
Step 5: Open the App or Tool You Want to Use
Now launch the app that matches your goal. For example:
- Google Photos if you want automatic photo backup and easy access across devices.
- Google Drive if you want to store image files in folders like regular documents.
- OneDrive if you use Windows and want your photos connected to Microsoft services.
- Dropbox if you want flexible cloud storage and syncing.
- Windows Photos or File Explorer if you are uploading pictures from Android to a PC with a USB cable.
- Quick Share or Link to Windows if you want a wireless transfer route.
The best app depends on your routine. Google Photos is great for automatic backup. Google Drive is better if you want neat file folders. OneDrive works well for Microsoft users. Dropbox is handy for flexible sharing and syncing. Pick the tool that fits your life, not just the one already staring at you from your home screen.
Step 6: Choose Upload, Backup, or Transfer
This is the moment where each service starts to look a little different.
In Google Photos, you are usually turning on backup rather than tapping a one-time upload button. In Google Drive, you typically tap New and then Upload. In OneDrive or Dropbox, you might either choose a manual upload or turn on camera backup. On Samsung devices, you may also see Gallery sync options with OneDrive integration. On a PC, you may connect the Android phone with a USB cable and choose File Transfer mode so the computer can access your folders.
Same goal, different labels. Upload. Backup. Sync. Transfer. Technology loves synonyms almost as much as it loves confusing people with them.
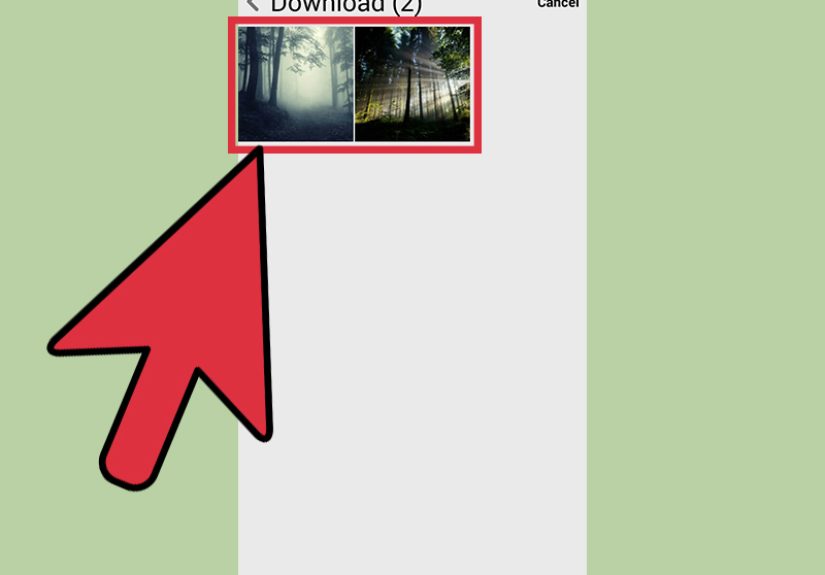
Step 7: Select the Pictures or Folders
Once the upload tool is open, choose your images. For manual uploads, tap the photos you want and confirm the selection. For automatic backup, choose which folders should be included. This is especially important if you want more than your camera roll saved. Screenshots, social media downloads, edited images, and messaging photos often live in separate folders.
If you skip this step, you may upload too little or way too much. That is how people end up with either missing memories or a cloud account filled with 482 screenshots of recipes they never cooked.
Step 8: Adjust Settings for Quality, Data Use, or Destination Folder
Before you hit the final upload button, check the settings. Many Android upload tools let you control where photos go, whether videos are included, how mobile data is used, and whether original-quality files are preserved. If you are uploading to a computer, choose the destination folder on the PC. If you are using cloud storage, confirm the folder or album name.
This is also the moment to think practically. Are you backing up every image automatically, or only selected albums? Do you want instant syncing over mobile data, or only over Wi-Fi? Do you want your files organized by date, project, or event? A few extra taps here make your future self much happier.
Step 9: Start the Upload and Wait for Confirmation
Now begin the upload. Depending on the app, that may mean tapping Upload, Back up now, Turn on camera backup, Import, or Send to PC. If you are connected by USB, keep the phone unlocked and don’t unplug it halfway through. If you are transferring wirelessly, stay in range and keep the app open if needed.
Do not assume the pictures uploaded just because the button was tapped. Wait until you see a status message, completed icon, synced album, or imported file list. This is the digital version of waiting to hear the front door click shut instead of just hoping it did.
Step 10: Verify That the Photos Are Actually There
This final step is the one people skip, and it is also the one that prevents future heartbreak. Open the destination and verify the upload. Check the folder in Google Drive. Open the album in Google Photos. Visit OneDrive or Dropbox. Open the folder on your PC. Make sure the photos are visible, complete, and not just thumbnails waiting on a failed sync.
If you uploaded important pictures, verify them on a second device too. Once you know the photos landed safely, you can keep them on your Android device, delete local copies to save space, or create an extra backup somewhere else. Redundancy may not sound glamorous, but neither does losing your wedding photos.
Best Ways to Upload Pictures from Android
If you want the short version, here is how to choose the best method:
- Use Google Photos for easy automatic backup and access across devices.
- Use Google Drive for manual uploads into specific folders.
- Use OneDrive if your workflow revolves around Windows.
- Use Dropbox for flexible syncing and sharing.
- Use USB to a PC if you want direct local storage and a reliable wired transfer.
- Use Quick Share or Link to Windows if you want a wireless path to your computer.
There is no single best choice for everyone. The right method depends on whether you prioritize backup, organization, speed, storage, or convenience.
Common Problems When Uploading Pictures from Android
If your Android pictures are not uploading, check these common trouble spots:
- The app does not have permission to access photos or files.
- You are signed into the wrong account.
- Your internet connection is weak or unstable.
- Your cloud storage is full.
- Your USB cable only charges and does not support data transfer.
- Your phone is locked while connected to a computer.
- The backup settings are only allowing Wi-Fi uploads.
Most of the time, the fix is not dramatic. It is usually one boring little setting standing in the corner pretending it did nothing.
Experience-Based Tips: What Actually Helps in Real Life
After working through Android photo uploads in everyday situations, a few patterns show up again and again. First, automatic backup sounds magical, and honestly, it kind of is. Once people turn on a reliable photo backup service, they stop treating every full-storage warning like a five-alarm fire. Instead of manually moving photos every few months in a panic, they know their images are already being saved behind the scenes. That one change alone can make Android photo management feel dramatically less chaotic.
Second, manual uploads still matter. Automatic backup is excellent for peace of mind, but manual uploads are often better for organization. If you are managing client images, family event photos, school projects, or design references, tossing everything into one giant stream is not always helpful. A manual folder structure in Google Drive, Dropbox, or on a PC can save time later. It is the difference between “I know I uploaded it somewhere” and “Here it is, in the folder named exactly what it should be.” A thrilling difference, to be honest.
Another real-world lesson: cables are weirdly important. People assume any USB cable will work for photo transfer, but many cables only charge. That leads to one of the most common upload frustrations: the phone charges beautifully, but the computer acts like nothing is connected. Swapping the cable often fixes the problem faster than twenty minutes of suspiciously aggressive tapping. It feels unfair, but it is true.
Wireless tools are also better than they used to be. For smaller batches of pictures, Quick Share, Link to Windows, and cloud syncing can feel easier than plugging into a computer. They are especially convenient when you want a few images on your laptop right away. But for large collections, a wired transfer or a patient overnight cloud backup still tends to be more dependable. Wireless uploads are convenient. Wired uploads are dependable. Your best choice depends on whether you are in a hurry or in recovery mode after discovering 9,000 photos on your device.
One more experience-driven tip: verify before deleting. It is very tempting to upload photos, see a progress bar finish, and immediately clear space on your phone. Resist that urge. Open the destination. Check the actual files. Scroll through them. Make sure the full-resolution images are present and complete. This is especially important after travel, work projects, or anything sentimental. The tiny habit of checking first can prevent the giant headache of realizing later that only part of the upload finished.
Finally, consistency beats intensity. You do not need a heroic, all-day digital cleanup marathon every six months. You just need a method you will actually use. Maybe that means Google Photos on Wi-Fi, a monthly backup to a Windows PC, or a project-based upload system in Drive or Dropbox. The best Android photo upload strategy is not the fanciest one. It is the one that quietly works often enough that you stop thinking about it. That is the dream: fewer storage warnings, fewer missing files, and fewer late-night searches for “where did my Android pictures go?”
Conclusion
Learning how to upload pictures from Android is really about building a simple routine. Choose the destination, prepare your phone, select the right photos, upload them carefully, and always verify the results. Whether you use Google Photos, Google Drive, OneDrive, Dropbox, a Windows computer, or a wireless transfer tool, the process gets much easier once you understand the pattern.
Do it once, and it feels manageable. Do it regularly, and it becomes second nature. Then your pictures are safer, your Android storage is happier, and your future self gets to avoid a surprisingly emotional conversation with a missing vacation album.